
13-Square Granny Square Bag (Free Pattern)
If you’ve ever wanted to turn classic granny squares into something you’ll actually use every day, this Granny Square Bag Pattern is a great place to start. Instead of making a flat pouch, we’ll fold 13 traditional granny squares into a roomy 3D market tote.
The result is sturdy, colorful, and surprisingly roomy. Best of all, there’s no complicated shaping—just crochet, block, join, fold, and reinforce.
Skill Level: Advanced Beginner
Construction: 13 Classic Granny Squares folded into a 3D Market Tote
Finished Size: Approximately 14″ wide × 15″ tall, excluding straps
Gauge: 1 blocked square = 4.25″ × 4.25″
Time: 6–8 hours
Terminology: US crochet terms
Table of Contents
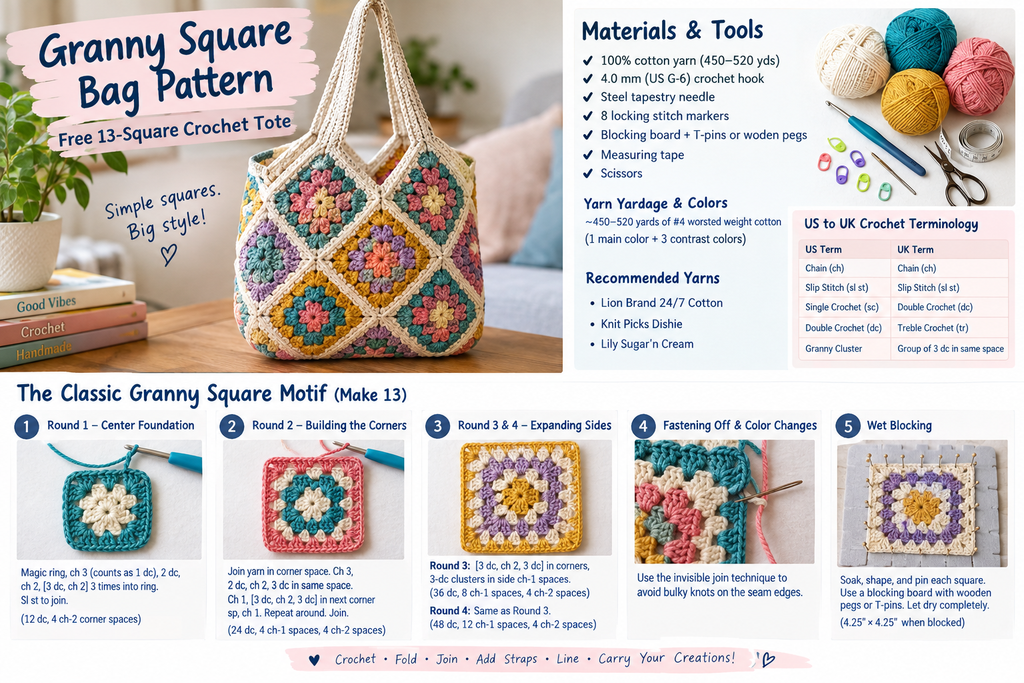
1. Yarn, Materials & Tool Checklist
Why 100% Cotton Yarn is Non-Negotiable
For this Granny Square Bag Pattern, I strongly recommend 100% cotton yarn. A bag has to deal with real-world abuse—groceries, books, water bottles, and that mysterious collection of receipts hiding at the bottom.
Acrylic yarn is soft and flexible, but that flexibility can work against you when the bag is carrying weight. Cotton has less stretch and gives the finished fabric a firmer structure with excellent stitch definition.
My favorite options are:
- Lion Brand 24/7 Cotton
- Knit Picks Dishie
- Lily Sugar’n Cream
- Other sturdy #4 worsted-weight cotton yarns
Mercerized cotton is particularly nice when you want crisp stitches and a slightly smoother finish.
Hook, Yardage & Notions
For one bag, gather:
- 450–520 yards of #4 worsted-weight cotton
- 4.0 mm (US G-6) crochet hook
- Steel tapestry needle
- 8 locking stitch markers
- Blocking board with wooden pegs or rust-resistant T-pins
- Measuring tape
- Scissors
For a fun stash-busting project, use one main color and three contrast colors. You can make every square identical or experiment with different color combinations.
2. Pattern Stitch Abbreviations & Terminology
This tutorial uses US crochet terminology.
| US Term | UK Term |
|---|---|
| Chain (ch) | Chain (ch) |
| Slip stitch (sl st) | Slip stitch (sl st) |
| Single crochet (sc) | Double crochet (dc) |
| Double crochet (dc) | Treble crochet (tr) |
| Granny cluster | Group of 3 dc worked into the same space |
A granny cluster means three double crochet stitches worked into the same chain space.
3. The Solid/Classic Granny Square Motif Pattern (Make 13)
You’ll need 13 finished granny squares for this bag.
Keep your tension consistent. If your squares aren’t the same size, the assembly can become more crooked than a shopping cart with one bad wheel.
Round 1 — The Center Foundation
Make a magic ring.
Ch 3 (counts as 1 dc), then work 2 dc into the ring. Ch 2.
Work [3 dc, ch 2] three times into the ring.
Sl st to the top of the beginning ch-3 to join.
Stitch count: 12 dc, 4 ch-2 corner spaces
Fasten off if changing colors.
Round 2 — Building the Corners
Join yarn in any corner ch-2 space.
Ch 3, then work 2 dc, ch 2, 3 dc into the same corner space.
Ch 1.
Work 3 dc, ch 2, 3 dc into the next corner space, followed by ch 1.
Repeat around.
Join with a slip stitch to the top of the beginning ch-3.
Stitch count: 24 dc, 4 ch-1 spaces, 4 ch-2 corner spaces
Rounds 3 & 4 — Expanding the Sides
For Round 3, slip stitch into the next corner space and begin with ch 3.
Work [3 dc, ch 2, 3 dc] into each corner space.
Between corners, work one 3-dc granny cluster into every side ch-1 space, separating clusters with ch 1.
Round 3 stitch count: 36 dc, 8 ch-1 spaces, 4 ch-2 corner spaces
For Round 4, continue exactly the same way. Each side now contains two granny clusters.
Round 4 stitch count: 48 dc, 12 ch-1 spaces, 4 ch-2 corner spaces
After Round 4, your blocked square should measure approximately 4.25″ × 4.25″.
If yours is larger or smaller, don’t panic. Adjusting hook size slightly is usually easier than trying to wrestle your finished bag into submission.
Fastening Off & Color Changes
When changing colors, avoid leaving bulky knots directly on the edges.
I like using an invisible join: fasten off normally, thread the yarn onto a tapestry needle, and mimic the top of the next stitch before weaving the tail securely through the back.
This creates a much cleaner seam when your squares are joined.
Wet Blocking: The Step You Cannot Skip
Please don’t skip blocking.
Unblocked granny squares can have wavy edges, uneven corners, and slightly different dimensions. Put thirteen of those together and suddenly your beautiful tote looks like it has opinions.
For cotton, I prefer wet blocking:
- Soak the squares in lukewarm water for about 10–15 minutes.
- Gently squeeze out excess water without twisting.
- Place each square on your blocking board.
- Stretch the corners until the square measures 4.25″.
- Secure the four corners with T-pins or blocking pegs.
- Allow the squares to dry completely.
Steam blocking can work for minor adjustments, but wet blocking is my first choice for reshaping cotton granny squares.
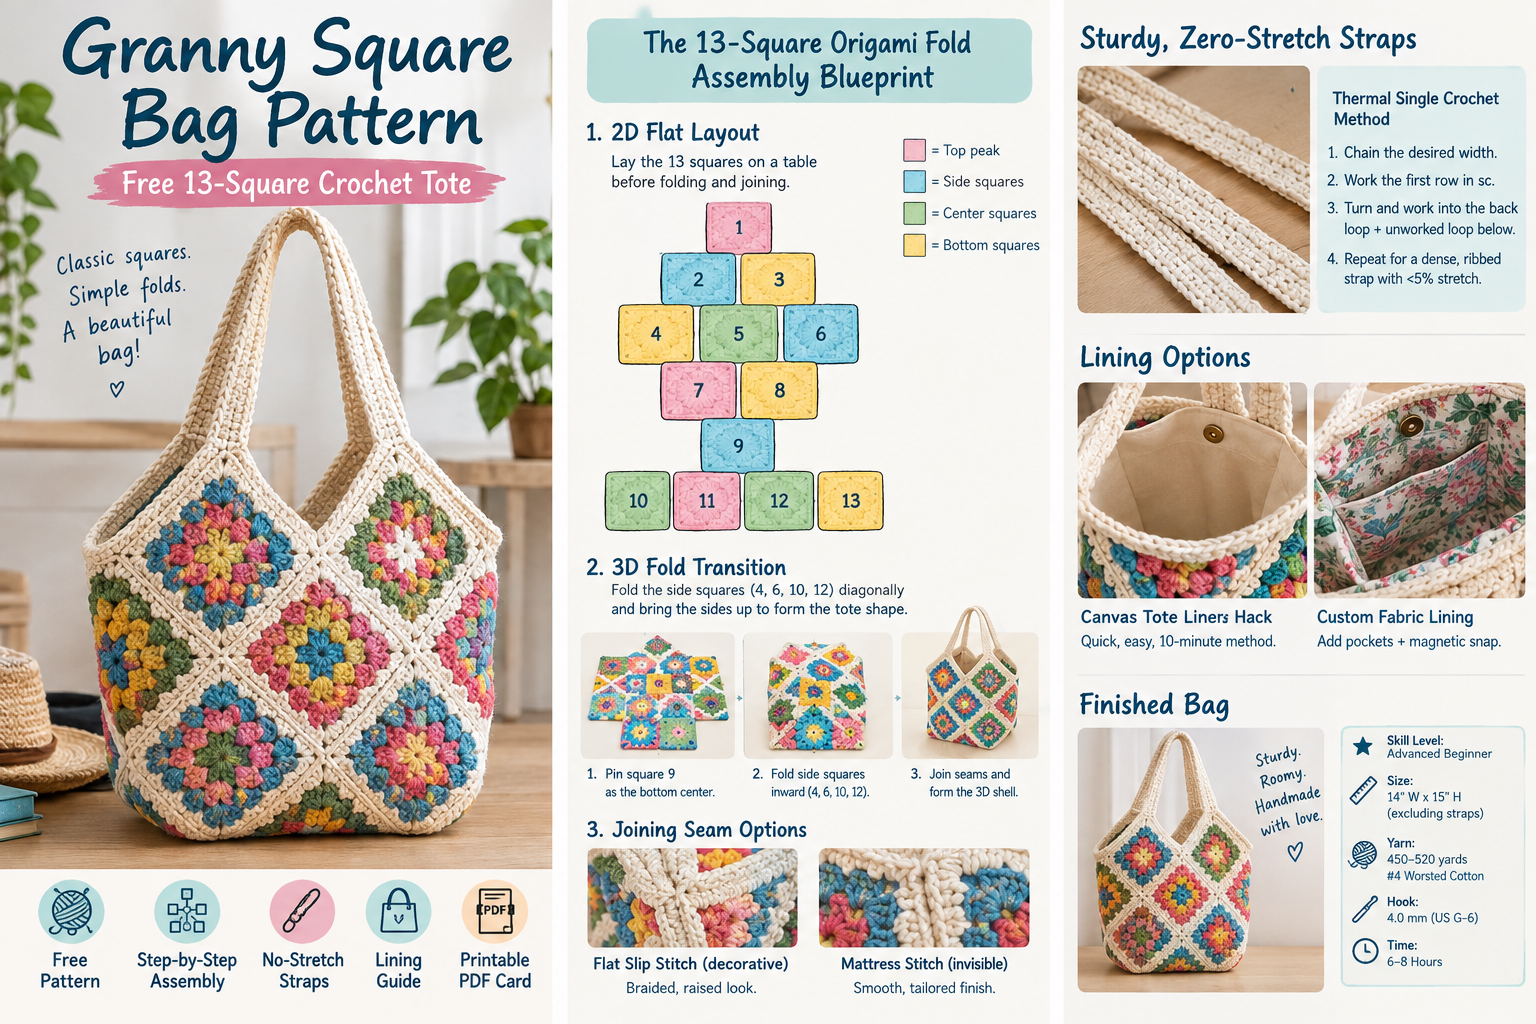
4. The 13-Square “Origami Fold” Assembly Blueprint
This is where this Granny Square Bag Pattern gets interesting.
Instead of simply sewing the squares into a flat rectangle, we create a folded shell that gives the bag depth.
The 2D Flat Layout Guide
Lay the squares on a large table before joining them.
                 [SQUARE 1]
                    /   \
          [SQUARE 2]     [SQUARE 3]
             /    \         /    \
       [SQUARE 4] [SQUARE 5] [SQUARE 6]
             \       |       /
             [SQUARE 7] [SQUARE 8]
                    \   /
                 [SQUARE 9]
                     │
          [10] [11] [12] [13]
Think of Square 9 as the bottom-center anchor. The surrounding squares become the walls and folded side sections.
The 3D Fold Transition — Step-by-Step
Start by positioning Square 9 as the bottom-center gusset.
Next:
- Pin Square 9 flat.
- Bring the surrounding body squares upward.
- Fold the side squares inward along their natural seams.
- Pay particular attention to Squares 4, 6, 10, and 12, which create the diagonal folds that give the tote its depth.
- Pin every intersection before stitching.
- Check that both sides are symmetrical.
- Join the seams only after you’re happy with the shape.
This is the part where taking five extra minutes to pin can save you 30 minutes of colorful frustration.
Choosing Your Joining Seam: Flat Slip Stitch vs. Mattress Stitch
You have two good options.
Option A — Flat Slip Stitch
Work a flat slip-stitch seam on the right side of the bag.
This creates a decorative braided ridge that looks especially good with contrasting yarn.
Option B — Mattress Stitch
For a cleaner, more tailored appearance, use mattress stitch through the back loops.
The seam virtually disappears when pulled snugly.
For an everyday market tote, I personally like the flat slip stitch because it adds strength while making the construction detail part of the design.
5. How to Make Sturdy, Zero-Stretch Straps
A beautiful bag isn’t much use if the handles stretch until the tote is practically touching your knees.
That’s why the straps in this Granny Square Bag Pattern use a dense thermal single-crochet technique.
Why Regular Crochet Straps Ruin Handmade Bags
A strap made with ordinary double crochet has plenty of vertical flexibility.
Add a full water bottle, wallet, phone, keys, and a few groceries, and that flexibility can turn into unwanted stretching.
For a sturdy tote, I want the handles to behave more like a thick woven cord.
The Thermal Single Crochet Method
Work your strap using thermal single crochet:
- Chain the desired strap width.
- Work the first row in single crochet.
- Turn.
- Insert your hook through the back loop of the current row and the unworked loop from the corresponding stitch of the row below.
- Yarn over and pull through.
- Complete the single crochet.
- Repeat across the row.
- Continue until the strap reaches your desired length.
The result is a dense, double-thick ribbed fabric with very little stretch.
For the best results, keep your tension firm but don’t pull every stitch so tightly that your hands start filing a complaint.
Seamless Strap Attachment & Top-Edge Reinforcement
Before attaching the handles, work a continuous single-crochet border around the top edge of the bag.
At the V-shaped peaks, work carefully around the corners so the border doesn’t pull inward.
When you reach each handle, crochet through the strap and bag edge several times to distribute the weight.
This reinforced top edge helps prevent the granny squares from separating under load.
6. How to Line Your Granny Square Bag (No Sewing Machine Needed)
Wondering how to line a crochet granny square bag without turning your craft room into a sewing studio?
Good news: you don’t need a machine.
The Canvas Tote Liner Hack — 10-Minute Method
This is my favorite shortcut.
Find an inexpensive canvas tote that’s slightly smaller than your finished crochet bag.
Then:
- Place the canvas tote inside the crochet shell.
- Push the bottom fully into the corners.
- Fold the canvas top edge inward.
- Position it just below the crochet rim.
- Hand-tack it around the top using a whip stitch.
That’s it.
The canvas gives the bag extra body while protecting the crochet fabric from sharp objects and heavy contents.
Custom Fabric Lining with Inner Slip Pockets
For a more polished result, make your own liner.
Cut two fabric panels shaped to match the bag profile, leaving enough extra fabric for seam and hem allowances.
Sew or hand-stitch the panels together, fold the upper hem inward, and attach the liner around the inside top edge.
Want pockets?
Add one or two rectangular fabric pockets before attaching the liner. You can even install a small magnetic snap for extra security.
7. Interactive Layout Variations — Beyond the 13-Square
Once you’ve mastered this Granny Square Bag Pattern, you can change the construction to create completely different bags.
The 3-Square Sling Bag
Want something much faster?
Use three granny squares and fold them into an envelope-style pouch.
This is a particularly good easy granny square bag for beginners because there are fewer seams and less shaping.
The 15-Square Deep Gusset Tote
Need more room?
Add another row of squares around the base to create a deeper gusset.
This variation is excellent for grocery shopping, farmers’ markets, or anyone who routinely carries approximately 47 things they didn’t plan on carrying.
The 2-Square Retro Handbag
For a smaller vintage-inspired design, join two large granny squares into a flat handbag.
Add bamboo or wooden ring handles for a retro finish.
8. Frequently Asked Questions
How many granny squares do you need for a bag?
It depends on the design.
- 3 squares: Small sling or envelope bag
- 13 squares: Structured 3D market tote
- 15 squares: Deeper gusset tote
- 24 squares: Larger, roomier tote or shoulder bag
If you’re making your first project, I’d start with three squares before tackling a larger construction.
How do you keep a crochet granny square bag from sagging?
Three things make the biggest difference:
Use cotton yarn, choose a dense stitch for the handles, and add a fabric lining.
A sturdy cotton base gives the bag better structure, while thermal single-crochet straps dramatically reduce handle stretch.
What is the best join for granny squares on a bag?
For strength and a visible handmade detail, I like a flat slip-stitch seam.
If you want the seams to visually disappear, mattress stitch is the better choice.
Can I wash a 100% cotton crochet bag?
Yes, but always check the yarn manufacturer’s care instructions first.
For washable cotton yarn, machine wash cold inside a delicates mesh bag when appropriate. Reshape the bag while damp and lay it flat to air dry.
Avoid hanging a wet bag because the weight of the water can stretch the fabric.
Final Thoughts
I love this Granny Square Bag Pattern because it takes a familiar crochet motif and turns it into something much more interesting than a simple flat tote.
The secret isn’t complicated crochet. It’s consistent squares, proper blocking, smart folding, reinforced seams, and sturdy handles.
Once you understand those five things, you can start experimenting with your own colors, square layouts, straps, pockets, and bag shapes.
And that’s when a simple granny square stops being just a granny square and starts becoming your next favorite handmade bag.