Sage Diamond Granny Tote Crochet Pattern Free Tutorial
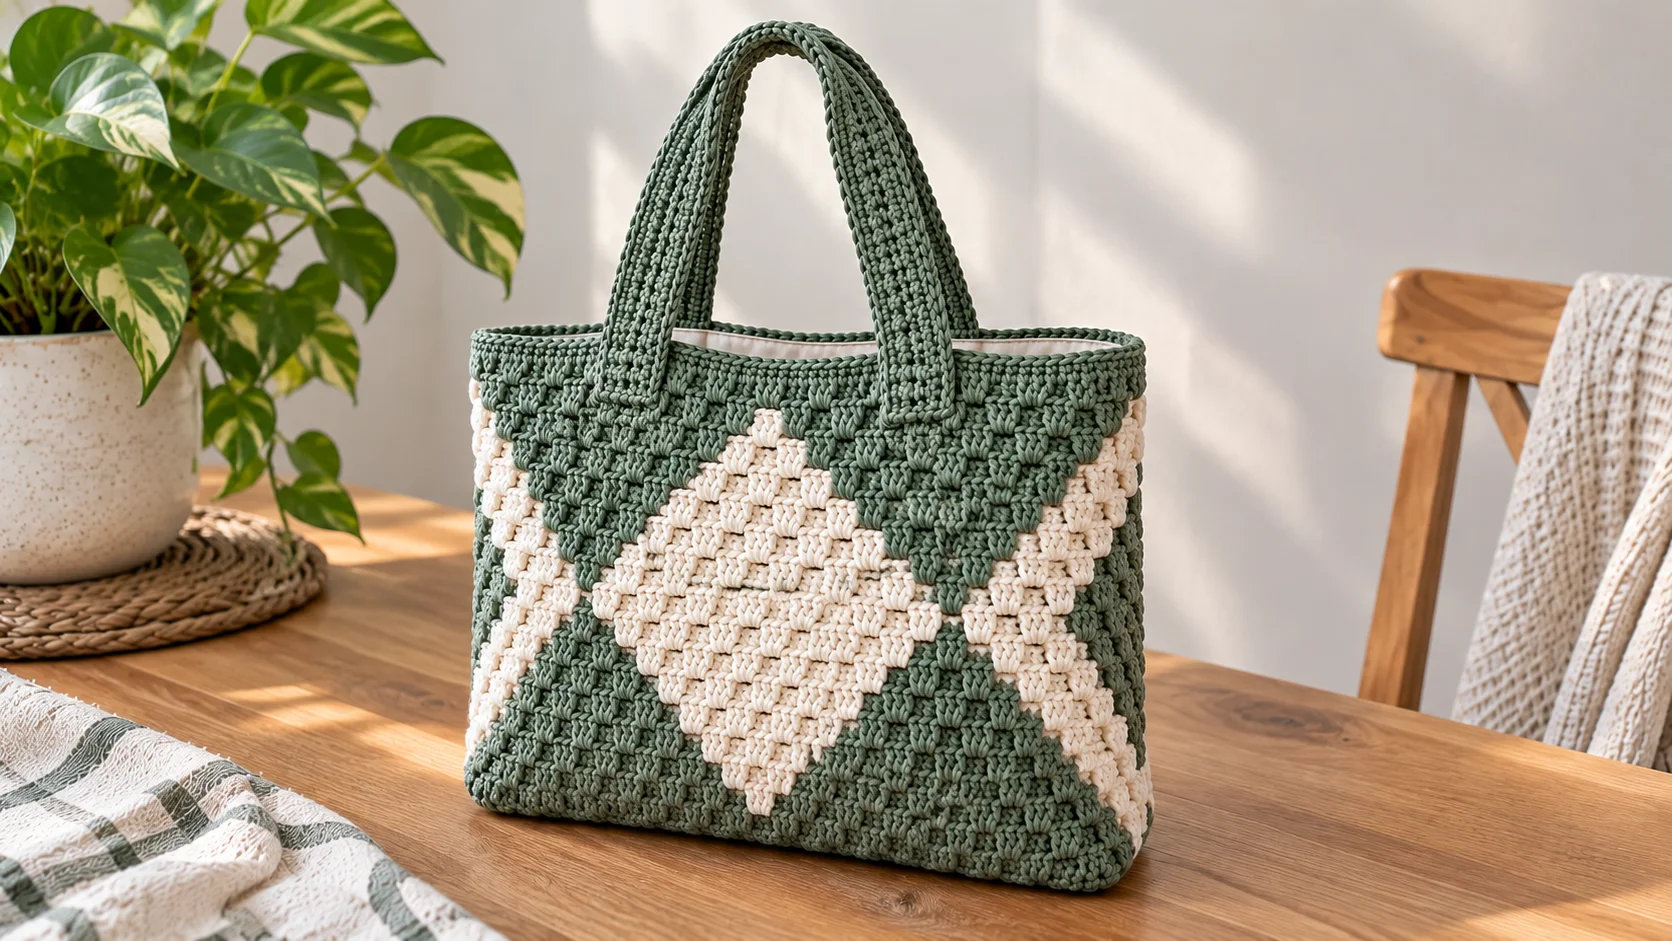
This Sage Diamond Granny Tote Crochet Pattern Jumper guide gives you a free granny square tote bag pattern with a cream diamond set inside a sage green square, plus layout notes for a matching jumper. Instead of joining dozens of small motifs, you crochet two corner-to-corner (C2C) panels, seam them to a firm side-and-base strip, and finish with reinforced straps. It suits confident beginners and up, and the color chart does the thinking for you. Follow the steps, check your gauge, and you will have a tote that looks far more complicated than it is.
Table of Contents
Quick Answer: What Is the Sage Diamond Granny Tote?
Quick answer: The sage diamond granny tote is an easy-intermediate crochet bag made from two 11 × 11-block C2C panels in sage green and cream cotton. A seamed side-and-base strip, a six-row single crochet top band and webbing-reinforced straps complete it. Plan on about 12 hours, roughly 360 yards of worsted cotton, and a finished size near 25 × 28 cm (10 × 11 in).
Project Snapshot
| Detail | Specification |
|---|---|
| Skill level | Easy intermediate (C2C and color changes) |
| Finished size | About 25 cm wide × 28 cm tall × 8 cm deep (10 × 11 × 3 in) |
| Time | About 12 hours |
| Yarn | Worsted (CYC 4) cotton: about 305 yd sage, 60 yd cream (estimate) |
| Hooks | 4.0 mm for panels; 3.5 mm for strip, band and straps |
| Gauge | 4 × 4 C2C blocks ≈ 9.5 cm (3¾ in) |
| Construction | Two C2C panels, one side-and-base strip, sc top band, two straps |
Design Notes: Why the Diamond Frames Work
Why does a diamond look so good on a granny-style bag? C2C grows each panel diagonally, so a stepped diamond appears naturally when you change color at predictable points. Sage carries the four corner triangles while a cream diamond touches the midpoint of every edge, giving the sage diamond granny tote a clean geometric look instead of a busy patchwork. The soft, low-contrast palette pairs with denim, linen and neutrals. Because the front and back are single panels rather than a dozen motifs, this diamond granny square bag has fewer seams, lies flatter and holds its shape better.
Materials and Tools
For the sage diamond granny tote, choose a sturdy worsted cotton with little stretch: it keeps the diamond crisp and the panels firm. Yardage is an estimate, so weigh your first panel and adjust.
| Item | Specification | Substitution |
|---|---|---|
| Sage yarn | About 305 yd (280 m) worsted cotton | Any CYC 4 cotton or low-stretch cotton blend |
| Cream yarn | About 60 yd (55 m), same weight | Ecru, oat or soft butter |
| Hook A | 4.0 mm | Adjust to match gauge |
| Hook B | 3.5 mm | One size below Hook A |
| Webbing | Two 60 cm lengths, 25 mm wide | Strips of firm canvas |
| Lining (optional) | Half a yard of cotton fabric | Cotton twill |
| Notions | Two bobbins, stitch markers, yarn needle, pins, sewing thread | Binder clips for markers |
Abbreviations and Gauge
US terms. ch chain; sl st slip stitch; sc single crochet; dc double crochet; sp space; st(s) stitch(es); C2C corner-to-corner. Block: ch 3 plus 3 dc worked into a ch-3 space.
Gauge: With Hook A, a 4 × 4 block swatch should measure about 9.5 cm (3¾ in). With Hook B, 16 sc and 18 rows should measure 10 cm (4 in). If your swatch is larger, go down a hook size; if smaller, go up. Matching gauge keeps the strip and panels the same length.
Diamond Color Chart
Each panel has 21 rows. S = sage, C = cream. Every row is symmetrical, so read it from either end.
| Row | Blocks | Colors |
|---|---|---|
| 1–5 | 1–5 | All S |
| 6 | 6 | 6 C |
| 7 | 7 | 1 S, 5 C, 1 S |
| 8 | 8 | 1 S, 6 C, 1 S |
| 9 | 9 | 2 S, 5 C, 2 S |
| 10 | 10 | 2 S, 6 C, 2 S |
| 11 | 11 | 3 S, 5 C, 3 S |
| 12 | 10 | 2 S, 6 C, 2 S |
| 13 | 9 | 2 S, 5 C, 2 S |
| 14 | 8 | 1 S, 6 C, 1 S |
| 15 | 7 | 1 S, 5 C, 1 S |
| 16 | 6 | 6 C |
| 17–21 | 5–1 | All S |
Step-by-Step Pattern
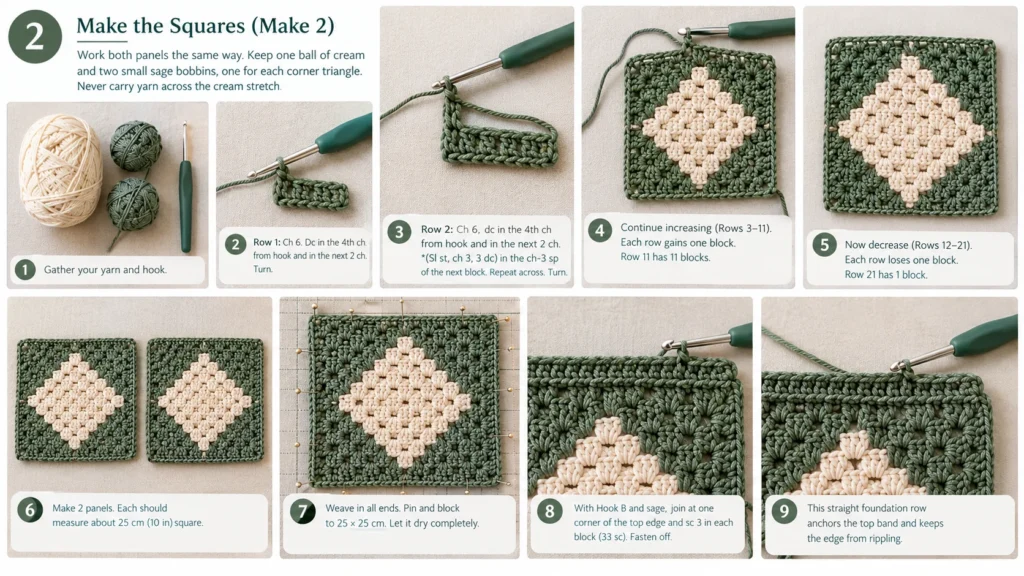
Work both panels of the sage diamond granny tote the same way. Keep one ball of cream and two small sage bobbins, one for each corner triangle, and never carry yarn across the cream stretch. Change color on the final pull-through of the last dc before the change, make the next joining slip stitch in the new color, and twist the yarns together to prevent holes.
Step 1: Make the Squares (Make 2)
Increase rows (Rows 1–11). With Hook A and sage:
Row 1: Ch 6. Dc in the 4th ch from hook and in the next 2 ch (1 block). Turn.
Rows 2–11: Ch 6, dc in the 4th ch from hook and in the next 2 ch (new block). *(Sl st, ch 3, 3 dc) in the ch-3 sp of the next block of the previous row; repeat from * across. Turn. Each row gains one block, so Row 11 has 11 blocks. Follow the chart for colors.
Decrease rows (Rows 12–21). Do not ch 6. Sl st across the first 3 dc and into the ch-3 sp. *(Sl st, ch 3, 3 dc) in the next ch-3 sp; repeat from * to the last ch-3 sp. Sl st in that last sp, turn, and do not make a block in it. Each row loses one block, so Row 21 has 1 block. Fasten off. Each panel should measure about 25 cm (10 in) square.
Step 2: Block and Join
Weave in all ends. Pin each panel to 25 × 25 cm, steam or wet-block it, and let it dry completely. Choose one edge as the top. With Hook B, join sage at one corner of that edge and sc 3 in each block along it (33 sc). Fasten off. This straight foundation row anchors the top band later and keeps the edge from rippling.
Step 3: Make the Base
With Hook B and sage, ch 14. Sc in the 2nd ch from hook and in each ch across (13 sc). Ch 1, turn. Next row: sc in each st across. Repeat the last row until the strip measures 75 cm (about 135 rows), then fasten off. This one strip forms both sides and the bottom. Mark 25 cm and 50 cm from one end; those marks are the bottom corners.
Step 4: Join the Base and Work the Top Band
Pin the strip’s long edge to the left, bottom and right edges of the front panel, matching the markers to the panel’s bottom corners and the strip’s ends to the top edge. Whipstitch with sage, easing as needed. Repeat with the back panel along the strip’s other long edge. Your sage diamond granny tote now has 8 cm of depth.
Top band. With Hook B, join sage at a side seam.
Round 1: Sc in each of the 33 foundation sts on the front, 13 sc across the strip end, 33 sc on the back, and 13 sc across the other strip end (92 sc). Join.
Rounds 2–5: Ch 1, sc in each st around (92 sc). Join. Fasten off and weave in ends.
Step 5: Straps and Attachment
Make 2. With Hook B and sage, ch 9. Sc in the 2nd ch from hook and across (8 sc). Ch 1, turn. Sc in each st across. Repeat until the strap measures 60 cm (about 108 rows). Fasten off, leaving a 40 cm tail. Sew webbing to the back of each strap (see the next section). Overlap each end 3 cm onto the inside of the top band, centered over blocks 3 and 9 of the panel, and sew a square with an X through all layers. Repeat on the back.
Reinforcing and Lining the Tote
Cotton stretches under load, so reinforce your sage diamond granny tote before it meets a laptop or groceries. Hand-stitch a 60 cm length of 25 mm cotton webbing along the back of each strap with sewing thread, stopping 1 cm short of each end. For a flat base, slip a 24 × 7 cm piece of plastic canvas, or card wrapped in fabric, inside the bottom.
To line the tote, cut two panels 28 × 31 cm and one strip 11 × 84 cm (this includes 1.5 cm seam allowances). Sew the strip around the sides and bottom of both panels, marking the corners at 28 cm and 53 cm from the seam line. Fold the top edge down 1.5 cm and whipstitch it inside the band, just below the strap ends. Hand-sewing works fine.
Colorway Ideas
The sage diamond granny tote works in any pair of colors with clear contrast. On a diamond granny square bag, keep one deep and one light shade so the diamond stays crisp.
| Colorway | Mood |
|---|---|
| Sage and cream (as written) | Calm, neutral |
| Terracotta and oat | Warm, autumnal |
| Navy and ecru | Crisp, classic |
| Dusty rose and cream | Soft, spring |
| Charcoal and mustard | Bold, graphic |
Make a Matching Jumper: Sage Diamond Granny Sweater Layout
The diamond scales up easily because C2C simply keeps growing. This is a layout guide, not a full pattern, so swatch before you commit.
At the tote gauge, one block is about 2.3 cm. Any square with an odd number of blocks per side (N) can hold the same diamond: color a block cream if it is no more than (N − 1) ÷ 2 steps from the center block, counting steps across and down, and sage otherwise. A 21-block square, for example, measures about 48 cm and has a 55-block sage triangle in each corner. Make one for the front and one for the back, giving a boxy body of about 96 cm (38 in) around.
Seam the shoulders, leaving a neck opening, then seam the sides, leaving armholes. Choose a soft cotton blend and a hook one size up for drape, because stiff bag cotton makes a stiff jumper. Add sleeves and ribbing separately.
Troubleshooting
| Problem | Likely cause | Fix |
|---|---|---|
| Holes at color changes | Yarns not twisted | Twist yarns together; switch on the last pull-through of the final dc |
| Panel skews or is not square | Block count is off | Count blocks every row (Row 11 has 11); block firmly |
| Strip does not match panel edges | Gauge differs between hooks | Work the strip to match the three panel edges; ease while seaming |
| Straps stretch | Cotton under load | Sew webbing to the back of each strap |
| Bag slumps | No structure | Add the base insert and lining |
Care and Storage
Remove the base insert, then hand wash your sage diamond granny tote in cool water with mild soap. Press out water with a towel, never wring, and dry it flat in shape. Spot-clean the lining between washes. Store the bag lightly stuffed with tissue so the panels keep their shape.
FAQ
What is the best yarn for a free granny square tote bag pattern?
Sturdy worsted-weight cotton works best because it has little bounce, holds structure and resists pilling better than most acrylic or wool. Mercerized cotton adds sheen and stitch definition. Use a hook a size or two smaller than the label suggests for a dense, bag-ready fabric, and always check gauge first.
Do I need to block the panels?
Yes. Blocking evens out the C2C blocks, flattens curling edges and brings both panels to the same size, which makes seaming much easier. Steam or wet-block the cotton, pin it to measurements, and let it dry fully before you sew.
How do I stop the straps from stretching?
Reinforce them. Sew cotton webbing along the back of each strap, or work the strap in a dense stitch on a smaller hook. Attach the ends through several rows rather than one edge, and line the bag so the weight spreads evenly.
Can I make the sage diamond granny tote bigger or smaller?
Yes. Choose any odd number of blocks per side, apply the diamond rule from the jumper section, then make the base strip three times the panel edge. Nine blocks give about 21 cm; thirteen give about 30 cm. This diamond granny square bag scales cleanly.
Can the Sage Diamond Granny Tote Crochet Pattern Jumper idea work as a sweater?
Yes. The diamond rule scales to any odd number of blocks, so one large panel can form the front and another the back. Choose a soft, drapey cotton blend instead of stiff bag cotton, swatch first, and sketch the layout for your chest measurement before starting.
Key Takeaways
- Two 11 × 11 C2C panels create a true diamond, with sage corners and a cream center.
- Block both panels and match the strip to the panel edges for a square, flat-bottomed bag.
- Webbing and lining keep the straps and body from sagging.
- Use the Sage Diamond Granny Tote Crochet Pattern Jumper layout rule to scale the diamond for a matching sweater.
Final Thoughts
The Sage Diamond Granny Tote Crochet Pattern combines a familiar granny square technique with a fresh geometric layout and an earthy color palette. With carefully blocked motifs, strong cotton yarn, reinforced handles, and an optional lining, you can create a handmade accessory that looks attractive and works for everyday use.
If you enjoy making practical crochet accessories, save this pattern for your next project and experiment with your own combinations of sage, cream, olive, or other favorite colors.