Crochet Holly Granny Square: Free Christmas Pattern
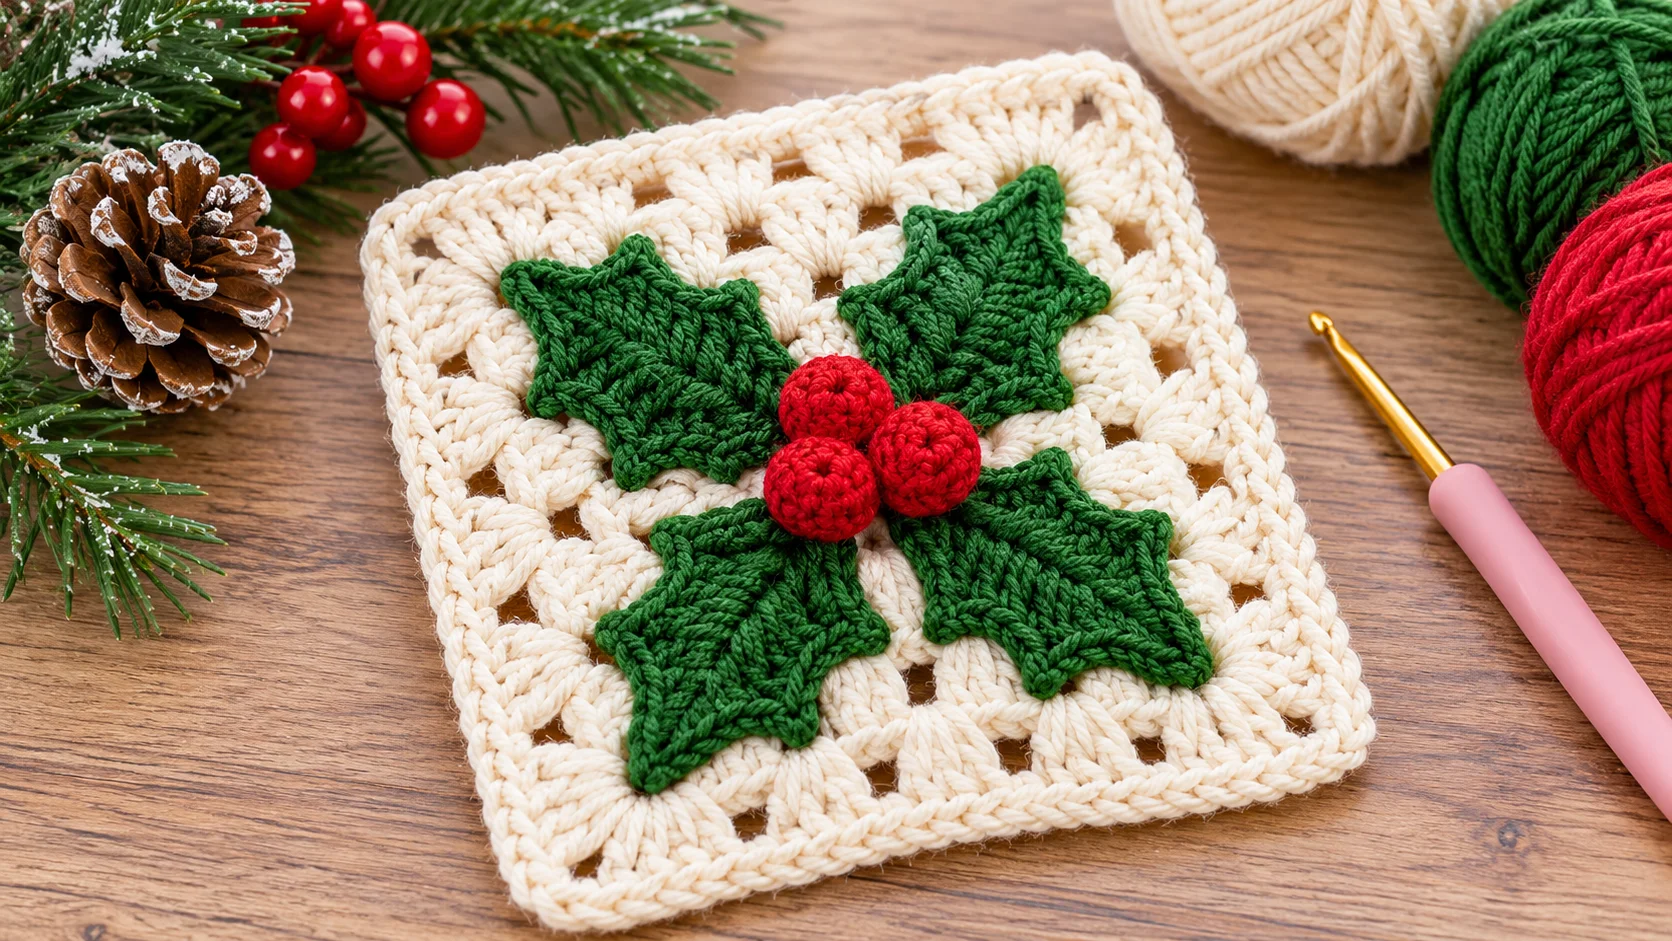
Few motifs say Christmas quite like a sprig of holly, and this crochet holly granny square puts one on a classic granny base. Stitch it into cozy holiday blankets, festive coasters, or a string of Christmas bunting, and it earns its place every time.
If you’ve been hunting for a Christmas granny square pattern free of charge and packed with real stitch counts, you’re in the right place. Below you’ll find written instructions, US-to-UK terms, gauge, blocking tips, and layout ideas, so every crochet holly granny square you make comes out the same size.
Table of Contents
Pattern at a Glance: Crochet Holly Granny Square
| Detail | Info |
|---|---|
| Skill Level | Advanced Beginner |
| Finished Size | 5″ × 5″ (12.7 × 12.7 cm) |
| Yarn Weight | Worsted (#4) / Aran |
| Key Techniques | Granny clusters, Picot stitch, Berry puff stitch |
| Time to Complete | 30–45 minutes per square |
| Language | Written in US terms (UK conversions provided) |
| Designed For | Modular blankets, holiday pillow covers, tree ornaments |
Materials, Yarn Requirements & Tools
Gather these supplies before you start your first crochet holly granny square. Yardage is approximate, so buy extra background yarn if you’re planning a full blanket.
| Component | Yarn Weight | Recommended Yarn / Fiber | Approx. Yardage | Colorway |
|---|---|---|---|---|
| Square Background | Worsted (#4) / Aran | 100% acrylic or cotton blend | 25 yards | Cream / Antique White |
| Holly Leaves | Worsted (#4) / Aran | 100% acrylic or cotton blend | 8 yards | Forest Green |
| Berries | Worsted (#4) / Aran | 100% acrylic or cotton blend | 3 yards | Cranberry Red |
Hook size: 4.5 mm (US 7) or 5.0 mm (US H-8), depending on your tension.
Notions: Tapestry/yarn needle, stitch markers, sharp scissors, blocking mat and pins.
Yarn tip: Choose smooth, plied yarn so the picots and puff stitches stay crisp, and keep every color in the same fiber so the pieces block alike.
Crochet Abbreviations & Stitch Glossary (US and UK)
This pattern uses US terms. UK, Australian, and New Zealand crocheters can use the right-hand column to translate each stitch.
| Abbreviation | US Term | UK Equivalent |
|---|---|---|
| ch | Chain | Chain (ch) |
| sl st | Slip stitch | Slip stitch (ss) |
| sc | Single crochet | Double crochet (dc) |
| dc | Double crochet | Treble crochet (tr) |
| hdc | Half double crochet | Half treble (htr) |
| tr | Treble crochet | Double treble (dtr) |
Two special stitches appear throughout:
- picot = Ch 3, sl st into the 3rd ch from hook (creates the pointed holly leaf tip).
- puff st = [Yarn over, insert hook, pull up a loop] 4 times into the same stitch, yarn over and pull through all loops on the hook, ch 1 to secure.
Video cue: If the magic ring or the picot is new to you, watch a short tutorial clip first. Both are easier to learn by seeing the motion once.
Gauge & Finished Measurements
Most granny square patterns skip gauge, which is why joined squares so often end up in different sizes. This one doesn’t.
Exact gauge: 4 rounds of standard granny square = 4″ (10 cm) across, measured before the edging round. The single crochet edging and light blocking bring the finished crochet holly granny square to about 5″ x 5″ (12.7 x 12.7 cm). If your square measures under 4″, go up a hook size; if it’s over, go down one.
Scaling tip: For tree ornaments, switch to DK weight yarn and a 3.5 mm hook for a roughly 3.5″ (9 cm) square. For a bolder block, use chunky yarn with a 6.0 mm hook for a roughly 7″ (18 cm) square. The stitch counts below stay the same.
Step-by-Step Crochet Holly Granny Square Instructions
Every round ends with a stitch count so you can confirm your work before moving on. Make the base first, then the leaves and berries.
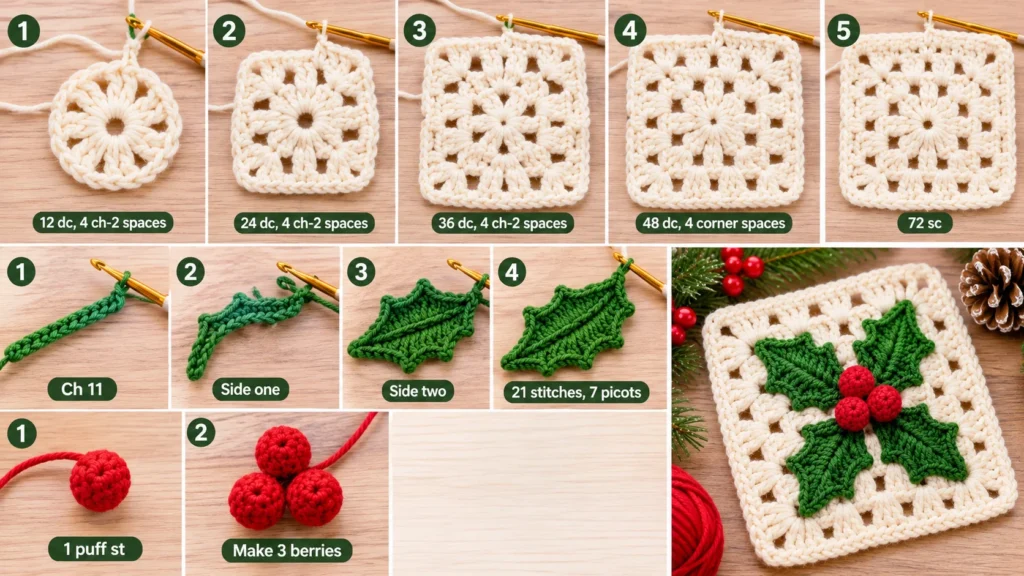
The Granny Square Base (Solid or Classic Style)
Work in Cream / Antique White for a classic look, or switch to a contrasting color for Rounds 3 and 4 to frame the center.
- Round 1 (center ring): Make a magic ring. Ch 3 (counts as first dc), 2 dc into the ring, ch 2. [3 dc into the ring, ch 2] 3 times. Join with a sl st to the top of the beginning ch-3, then pull the tail to close the ring. Stitch count: 12 dc, 4 ch-2 spaces.
- Round 2 (expansion): Sl st in the next 2 dc and into the first ch-2 space. Ch 3, (2 dc, ch 2, 3 dc) in the same space for the first corner, ch 1. [(3 dc, ch 2, 3 dc) in the next ch-2 space, ch 1] 3 times. Join. Stitch count: 24 dc, 4 ch-2 spaces.
- Round 3 (border formation): Sl st in the next 2 dc and into the first corner space. Ch 3, (2 dc, ch 2, 3 dc) in the same space, ch 1, 3 dc in the next ch-1 space, ch 1. [(3 dc, ch 2, 3 dc) in the next corner, ch 1, 3 dc in the next ch-1 space, ch 1] 3 times. Join. Stitch count: 36 dc, 4 ch-2 spaces.
- Round 4 (outer perimeter): Sl st in the next 2 dc and into the first corner space. Ch 3, (2 dc, ch 2, 3 dc) in the same space, ch 1, 3 dc in the next ch-1 space, ch 1, 3 dc in the next ch-1 space, ch 1. [(3 dc, ch 2, 3 dc) in the next corner, ch 1, 3 dc in the next ch-1 space, ch 1, 3 dc in the next ch-1 space, ch 1] 3 times. Join. Stitch count: 48 dc, 4 corner spaces.
- Round 5 (edging): Sl st in the next 2 dc and into the first corner space. Ch 1, 3 sc in the same space, then sc in every dc and every ch-1 space along each side, working 3 sc in each corner space. Join, fasten off, and weave in the ends. Stitch count: 72 sc.
Round 4 Stitch Count Check: 48 dc, 4 corner spaces. If your total is off, look for a missed ch-1 space near a corner.
The 3D Holly Leaves (Make 2 or 3)
This crochet holly leaf pattern builds a curved, pointed leaf from a single foundation chain. The graduated stitches (sc, hdc, dc, tr) shape the curve, and the picots form the spiky holly points. Chain loosely, because a tight foundation chain is the most common cause of curling.
- Foundation: With Forest Green, ch 11. Leave a 6″ tail for sewing.
- Side one: Starting in the 2nd ch from hook, work one stitch per chain: sl st, sc, hdc, dc, picot, tr, picot, tr, picot, dc, hdc, sc. That uses 9 chains. Work 3 sc in the last chain to turn the corner at the leaf base.
- Side two: Rotate and work into the free loops on the opposite side of the foundation chain, one stitch per chain: sc, hdc, dc, tr, picot, tr, picot, dc, picot, hdc, sc, sl st. This mirrors side one for a symmetrical leaf.
- Leaf tip: Work one more picot at the tip, then fasten off.
Stitch count check: 21 stitches (including the 3 sc at the base) and 7 picots per leaf.
The Holly Berry Cluster (Make 3)
Option A: 3D puff berries. With Cranberry Red, make a magic ring and work 1 puff st into it (the ch 1 is part of the stitch). Pull the ring tight, fasten off, and leave an 8″ tail. Weave the tail through the top of the puff to round it into a little sphere, then sew the berries onto the square. Stitch count: 1 puff st per berry.
Option B: French knots. For a flatter square that suits heavy-use blankets, embroider the berries instead. Bring the needle up, wrap the Cranberry Red yarn twice around it, insert it back right beside the starting point, and pull gently. Work 3 knots clustered together at the base of the leaves.
Assembly, Blocking & Anti-Curling Tips
Block the base square first, then add the leaves and berries so you never flatten the 3D elements.
Preventing Leaf Curl
Steam-block the leaves before attaching them. Pin each leaf flat on a blocking mat, hold a steam iron about 2 inches above it without touching the yarn, and let it cool completely before unpinning. Chaining loosely and working into both loops of the foundation chain also balances tension, which keeps any crochet holly leaf pattern flat.
Securing the Appliqué
Arrange two or three leaves in a V at the center or one corner of the square, with the berries tucked at the base. Pin everything in place. With a tapestry needle and Cream yarn, take small whip stitches that catch only the surface of the base stitches, never going through to the wrong side. Weave the tails inside the leaves rather than across the back, so no threads show on reversible blankets.
Final Blocking: Wet vs. Steam
- Acrylic yarn: Steam-block, holding the iron just above the fabric. Steam permanently relaxes acrylic, so shape the square first and never press the iron down.
- Wool or wool blends: Wet-block. Soak in lukewarm water with a gentle wool wash for 15 minutes, press out the water (don’t wring), then pin to size and dry flat.
- Cotton blends: Either method works. Wet-block for crisp edges, or mist lightly and pin to dry.
Pin the finished square to 5″ x 5″ (12.7 cm) and leave it until completely dry.
3D Appliqué vs. Flat Colorwork: Two Ways to Make a Crochet Holly Granny Square
Both methods give you the same festive look, but they wear very differently.
- 3D Appliqué Square: Best for seasonal wall hangings, bunting, pillows, and decorative gift bags. The leaves and puff berries add texture and dimension.
- Flat Intarsia / C2C Square: Best for high-use baby blankets, bed throws, and winter garments, where loose elements might catch on fingers or wear down in the wash. Chart the holly on a grid and work it in corner-to-corner (C2C), intarsia, or tapestry crochet so every color is built into the fabric.
Rule of thumb: If the project will be displayed or gently used, choose appliqué. If it will be washed weekly, choose flat colorwork.
Project Ideas & Layout Suggestions
Christmas Blanket Layout
Alternate holly squares with solid red and solid green squares in a checkerboard. For a 30″ x 40″ throw using 5″ squares, join 6 columns by 8 rows (48 squares). Place a holly square wherever the row number plus the column number is even (24 holly squares), then fill the other 24 spots with solid squares: red in odd rows, green in even rows (12 of each). Budget about 36 yards of yarn per holly square across all three colors.
Joining Method Recommendation
- Join-as-you-go (JAYG): Faster, with fewer ends to weave in, so it’s the better pick for a blanket. The join runs along the flat border, away from the leaves.
- Mattress stitch: Creates a flat, nearly invisible seam that suits pillow covers and tidy, separate-looking squares.
Border Suggestion
Frame the finished blanket with a candy cane border. Work single crochet around the edge, alternating red and white with every stitch and twisting the two yarns around each other before each stitch, so the colors spiral like a peppermint stick. Work 3 sc in each corner, and swatch first, because tension changes with two colors.
Frequently Asked Questions
How do I keep my crochet holly leaves from curling?
Block the leaves before attaching them: pin each one flat and hold a steam iron about 2 inches above the surface without touching it. You can also work into both loops of the foundation chain, which balances tension, and use a hook one size larger for the starting chain.
What is the best yarn for a Christmas granny square blanket?
Worsted weight acrylic (such as Lion Brand Vanna’s Choice or Stylecraft Special Aran) is ideal because it holds its shape, comes in rich holiday reds and greens, and is easily machine-washable. Cotton blends are a good alternative for a matte finish, though they run heavier.
Can I make this crochet holly granny square in different sizes?
Yes. To adjust the size, switch from worsted weight yarn to DK weight with a 3.5 mm hook (makes a ~3.5-inch square) or chunky weight with a 6.0 mm hook (makes a ~7-inch square). Stitch counts stay identical, so the written pattern works at any scale.
How do I wash a blanket with 3D crochet appliqués?
Hand wash or place the blanket inside a mesh laundry bag on a gentle cycle with cold water, then lay flat to dry to preserve the 3D shape of the berries and leaves. Skip the dryer and avoid wringing, which can pull the appliqués loose.
Final Thoughts
You now have everything you need to make a crochet holly granny square: exact gauge, verifiable stitch counts, a reliable crochet holly leaf pattern, and two ways to add berries. Stitch one test square, block it, and measure before committing to a whole blanket.
Bookmark this Christmas granny square pattern free for next season, and share a photo of your finished holly granny squares. Happy stitching!