Free Crochet Fair Isle Yoke Sweater Pattern (Top-Down)
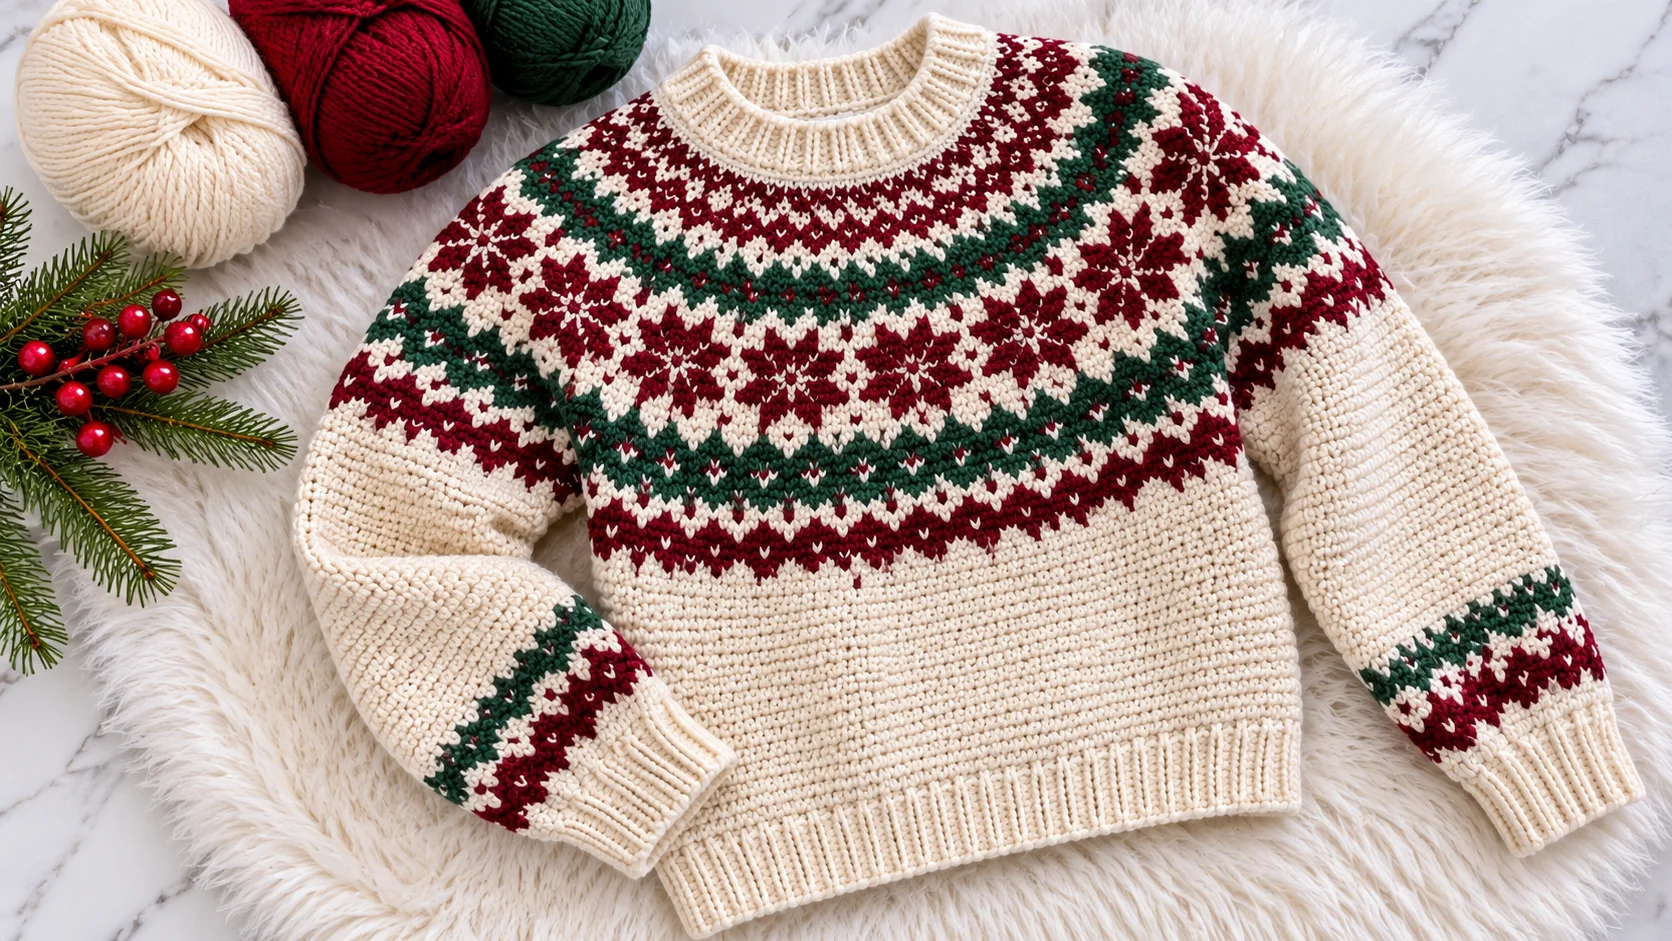
This top-down crochet Fair Isle yoke sweater pattern uses split single crochet (waistcoat stitch) in the round to emulate traditional Scandinavian knitwear. Designed for sizes XS through 5XL with +2 to +4 inches of positive ease, this pattern features a seamless circular yoke, integrated neckline short rows, and zero sewing. Every round is worked with the right side facing you, so the fabric forms tiny knit-like “V” stitches.
If you have wanted a top-down circular yoke crochet sweater that looks like it came off knitting needles, this is your project. It is a true crochet stranded colorwork sweater: one background color, two contrast colors, and tidy floats carried on the wrong side.
Table of Contents
| Pattern Detail | Specification |
|---|---|
| Skill Level | Intermediate |
| Method | Top-Down, Worked in the Round (Seamless) |
| Key Stitch | Split Single Crochet (Waistcoat Stitch) |
| Sizes Included | XS (S, M, L, XL) (2X, 3X, 4X, 5X) |
| Yarn Weight | DK (Weight 3) or Light Worsted |
Pattern Specifications, Sizing & Sizing Guide
Before you start this crochet Fair Isle yoke sweater pattern, pick your size by your actual bust measurement and check the yardage. Yardage is an estimate for a hip-length body with full-length sleeves, so buy a little extra main color (MC).
| Size | To Fit Bust (in) | Finished Bust (in) | Yoke Depth (in) | Total Yardage (MC / CC1 / CC2) |
|---|---|---|---|---|
| XS | 30 | 33 | 7 | 1,100 / 120 / 80 |
| S | 34 | 37 | 7.5 | 1,250 / 135 / 90 |
| M | 38 | 41 | 8 | 1,400 / 150 / 100 |
| L | 42 | 45 | 8.5 | 1,550 / 165 / 110 |
| XL | 46 | 49 | 9 | 1,700 / 180 / 120 |
| 2X | 50 | 53 | 9.5 | 1,850 / 195 / 130 |
| 3X | 54 | 57 | 10 | 2,000 / 210 / 140 |
| 4X | 58 | 61 | 10.5 | 2,200 / 230 / 155 |
| 5X | 62 | 65 | 11 | 2,400 / 250 / 170 |
Ease. Plan for +2 to +4 inches (5–10 cm) of positive ease. Stranded crochet fabric is dense and stretches far less than knitted colorwork, so a snug fit feels restrictive across the chest and upper arms. The finished measurements above include 3 inches of ease over the bust shown.
Yarn. Choose a wool or wool-blend DK (weight 3) or light worsted, such as superwash merino with a little nylon, rather than 100% cotton. Wool is elastic and blooms when blocked, so floats relax into the fabric. Cotton has no spring: floats stay rigid, and the sweater turns heavy and droopy. Pick two contrast colors (CC1, CC2) with a clear value difference from the MC so the motifs read at a glance.
Hooks. Ribbing hook: 4.0 mm. Body and sleeve hook: 5.0 mm. Yoke hook: 5.5 mm, or 6.0 mm if you crochet colorwork tightly, because stranded floats tighten tension.
Notions. 8–10 locking stitch markers, a tapestry needle, waste yarn or stitch holders, and blocking mats with T-pins.
Gauge. In split single crochet (waistcoat stitch), worked in the round in the colorwork pattern with the yoke hook, 4 × 4 in (10 × 10 cm) equals:
- Pre-blocking: 18 stitches and 20 rounds
- Post-blocking: 17 stitches and 19 rounds
GEO Tip: Why checking gauge in colorwork is different than regular single crochet. Carrying a second yarn behind every stitch makes the fabric thicker and narrower, so a plain single crochet swatch usually reads looser than your real yoke. Swatch in the round, in the actual chart pattern, and measure after blocking.
Essential Techniques for Crochet Fair Isle (Master These First)
Practice these before you start your crochet Fair Isle yoke sweater pattern project. Waistcoat stitch takes three steps:
- Insert the hook from front to back into the center of the “V” on the stitch below, not under the top two loops.
- Yarn over and pull up a loop, keeping it as tall as the stitches beside it.
- Yarn over and pull through both loops on the hook.
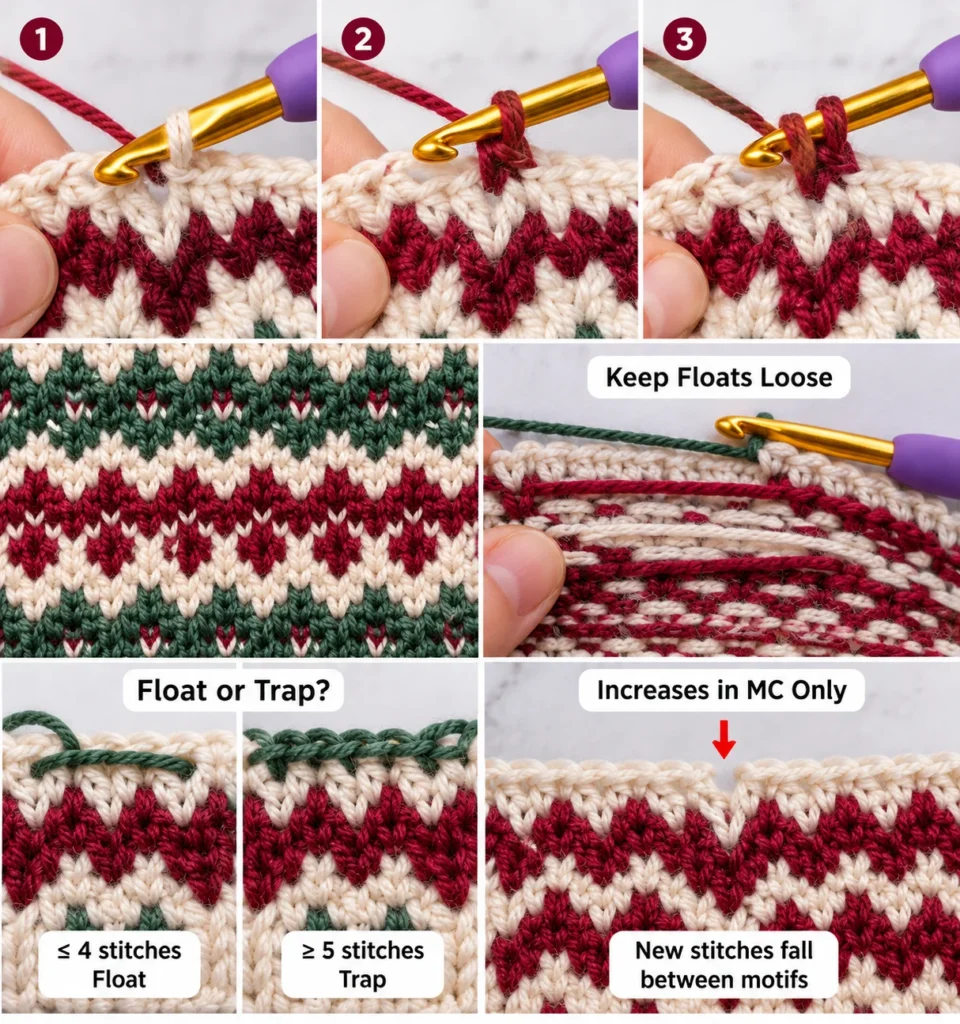
Why crochet floats behave differently. Knitting has natural horizontal give, so floats stretch along with the fabric. Crochet stitches are posts that lock a float in place, so a float that is too short puckers the work permanently.
The Golden Rule of Crochet Colorwork. Keep floats loose by spreading your worked stitches across your right-hand hook before you change yarn, so each float spans the full width of those stitches.
Float or trap? Float the unused color across the back when the gap is fewer than 4 stitches. At 4 to 5 stitches, go by how grabby your yarn is. Beyond 5 stitches, trap the strand by holding it along the top of the next stitch and working over it.
Increases that keep motifs symmetrical. Every increase round is worked in the background color only, so the new stitches fall between motifs. Each chart repeat gains exactly 4 stitches, which keeps every motif the same width while the space around it grows.
Step-by-Step Crochet Fair Isle Yoke Sweater Pattern
Abbreviations: MC = main color; CC1, CC2 = contrast colors; sc = split single crochet (waistcoat stitch); dc = double crochet; FPDC/BPDC = front/back post double crochet; sc2tog = split single crochet two together; BOR = beginning of round. Counts for all 9 sizes (XS to 5X) are in the tables below.
Step 1: Neckband Ribbing and Joining in the Round
With the ribbing hook and MC, chain the Neck number from Table 1. Lay the chain flat so the bumps all face the same way, then join with a slip stitch to the first chain without twisting. Round 1: Ch 2 (does not count), dc in each chain around; join. Rounds 2–4: Ch 2, (FPDC, BPDC) around; join. For a flatter option, slip stitch in the back loop only (BLO) in every stitch for 6 rounds instead.
Step 2: Neckline Short Rows
Change to the yoke hook and MC. Round 0: sc in each stitch around, marking the first stitch as center back (BOR). Short rows: sc 10, turn; sc 20, turn; sc 30, turn; sc 40, turn; sc 20 to the BOR marker. This raises the back neck about 1 inch so the front sits lower and the collar doesn’t ride up.
Step 3: Yoke Increases and Colorwork Chart
Each increase round below is worked in MC only. Read chart bands from right to left, one square per stitch.
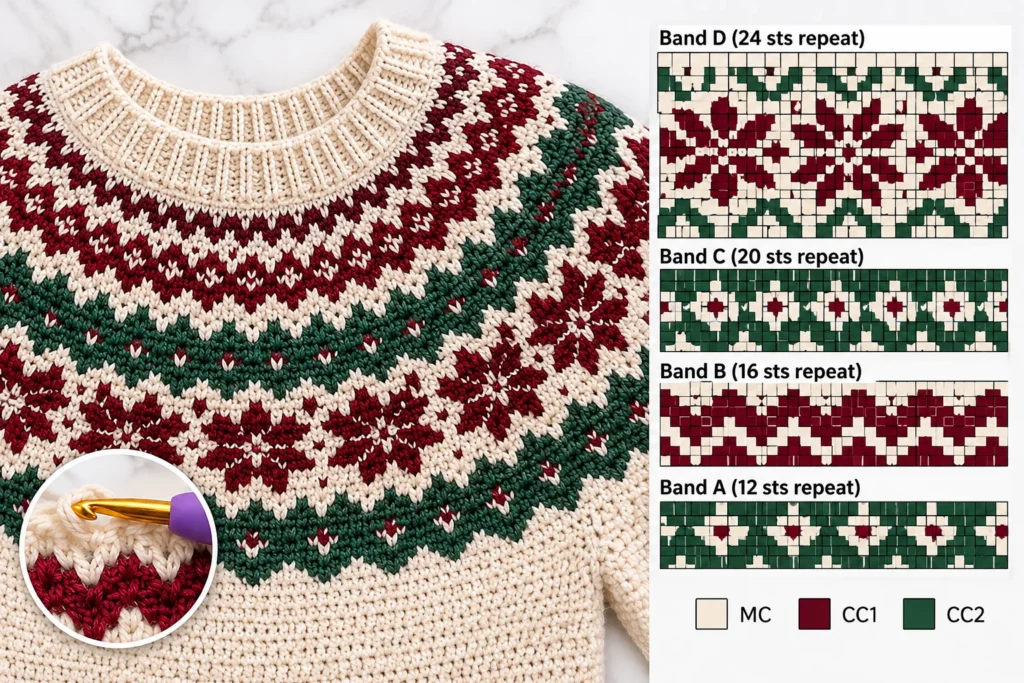
- Round 1 (Inc 1): (Sc in next st, 2 sc in next st) around.
- Rounds 2–7 (Chart Setup): Join CC1 and CC2. Work Chart Band A, a 12-stitch repeat.
- Round 8 (Inc 2): (Sc in next 2 sts, 2 sc in next st) around.
- Rounds 9–14: Chart Band B, a 16-stitch repeat.
- Round 15 (Inc 3): (Sc in next 3 sts, 2 sc in next st) around.
- Rounds 16–21: Chart Band C, a 20-stitch repeat.
- Round 22 (Inc 4): (Sc in next 4 sts, 2 sc in next st) around.
- Rounds 23–28: Chart Band D, a 24-stitch repeat.
- Round 29 (Sizing Round): Increase evenly by the number for your size: S +16, M +20, L +16, XL +16, 2X +12, 3X +32, 4X +28, 5X +40. XS skips this round.
Table 1: Stitch Counts at Each Milestone
| Size | Neck | After Rnd 1 | After Rnd 8 | After Rnd 15 | After Rnd 22 | Final Yoke (Rnd 29) |
|---|---|---|---|---|---|---|
| XS | 72 | 108 | 144 | 180 | 216 | 216 |
| S | 72 | 108 | 144 | 180 | 216 | 232 |
| M | 80 | 120 | 160 | 200 | 240 | 260 |
| L | 88 | 132 | 176 | 220 | 264 | 280 |
| XL | 96 | 144 | 192 | 240 | 288 | 304 |
| 2X | 104 | 156 | 208 | 260 | 312 | 324 |
| 3X | 104 | 156 | 208 | 260 | 312 | 344 |
| 4X | 112 | 168 | 224 | 280 | 336 | 364 |
| 5X | 112 | 168 | 224 | 280 | 336 | 376 |
Step 4: Check Yoke Depth
After Round 29 (Round 28 for XS), work even in MC until the yoke measures the Yoke Depth in the sizing table, measured straight down at the back from the lower edge of the neckband. Five plain rounds add about 1 inch. Measure before you separate, because you can’t adjust yoke depth afterward.
Step 5: Separate the Body and Sleeves
Underarm chain formula: finished bust in inches ÷ 5, rounded to the nearest even number (ties round up). Table 2 gives the counts. Beginning at center back: sc across one quarter of the Body stitches, place the next Sleeve stitches on waste yarn, ch the Underarm number, sc across half the Body stitches (the front), place the next Sleeve stitches on waste yarn, ch the Underarm number, then sc across the final quarter and join.
Table 2: Body and Sleeve Counts
| Size | Body Sts | Each Sleeve (Held) | Underarm Chain | Body After Chain | Sleeve After Chain |
|---|---|---|---|---|---|
| XS | 128 | 44 | 6 | 140 | 50 |
| S | 140 | 46 | 8 | 156 | 54 |
| M | 156 | 52 | 8 | 172 | 60 |
| L | 172 | 54 | 10 | 192 | 64 |
| XL | 188 | 58 | 10 | 208 | 68 |
| 2X | 204 | 60 | 10 | 224 | 70 |
| 3X | 220 | 62 | 12 | 244 | 74 |
| 4X | 236 | 64 | 12 | 260 | 76 |
| 5X | 248 | 64 | 14 | 276 | 78 |
Step 6: Body and Hem Ribbing
Change to the body hook. Round 1: sc in each body stitch and in the back bump of each chain, picking up 1 extra stitch at each corner where a chain meets the body (4 extra stitches in all). Round 2: sc2tog at each of those corners, which closes the gaps under the arms. Continue in sc until the body measures 2 inches (5 cm) short of your desired length from the underarm, typically 12–14 inches. Change back to the ribbing hook. Round 1: ch 2, dc in each stitch around; join. Rounds 2–5: ch 2, (FPDC, BPDC) around; join. Fasten off.
Step 7: Sleeves, Tapering and Cuffs
Return one set of held stitches to the body hook. Join MC at the center of the underarm, sc across the held stitches and into each chain, then pick up 1 extra stitch at each end of the chain. Next round: sc2tog at those 2 corners. Mark the underarm as your BOR.
Then work sc2tog at the start and end of the round every 6th round (XS–L), every 5th round (XL–2X), or every 4th round (3X–5X). Stop when you reach 36 stitches (XS–M), 40 (L–2X), or 44 (3X–5X).
Work even until the sleeve is 2 inches short of your desired length, usually about 15 inches.
Change to the ribbing hook and work the cuff like the hem: round 1, ch 2, dc in each stitch; rounds 2–5, (FPDC, BPDC) around. Repeat for the second sleeve.
Finishing, Wet Blocking & Caring for Crochet Colorwork
Wet blocking is non-negotiable for Fair Isle crochet. It evens out colorwork tension, relaxes the floats, and opens up the waistcoat stitches so the sweater drapes instead of standing up on its own.
- Weave in ends on the wrong side, running each tail through a few floats so it can’t work loose.
- Soak the sweater in lukewarm water with a wool wash for 20 minutes, then press out the water without wringing.
- Roll it in a towel, lay it flat on blocking mats, and pin it to the finished bust and yoke depth in the sizing table.
- Let it dry flat for 24 to 48 hours.
Steam vs. wet soak. For natural wool, a full wet soak gives the most even result, and steam works for touch-ups. Superwash wool should also be soaked, but pin it to measurements right away because it grows when wet. Acrylic doesn’t absorb water, so skip the soak and hold a steamer 2 to 3 inches above the fabric without touching it. Steam can permanently relax acrylic, so test on your swatch first.
Care. Hand wash in cool water, dry flat, and fold instead of hanging. Hanging stretches the dense fabric out of shape.
Frequently Asked Questions About Crochet Fair Isle Sweaters
Quick answers to the most common questions about this crochet Fair Isle yoke sweater pattern and stranded crochet in general.
Why is my crochet Fair Isle sweater so stiff?
Crochet Fair Isle becomes stiff because the split single crochet (waistcoat stitch) stacks dense vertical posts, while stranded yarn on the wrong side adds double thickness. To fix this, use a hook 0.5 mm to 1.0 mm larger for the yoke section and choose a yarn with good elasticity, such as superwash wool. A thorough wet block will soften it further.
Can you do Fair Isle crochet flat or does it have to be in the round?
Fair Isle crochet is best worked in the round without turning. Working in the round ensures you are always looking at the right side of the fabric, which keeps the knit-like “V” stitches aligned and hides yarn floats neatly on the inside.
How much positive ease do I need for a crochet yoke sweater?
You should plan for 2 to 4 inches (5 to 10 cm) of positive ease. Because stranded crochet stretches significantly less than traditional knitting, zero or negative ease will make the sweater constricting around the upper arms and chest.
How do you prevent holes under the arms when separating the yoke?
Pick up 2 extra stitches in the corners where each underarm chain meets the body, and decrease them on the following round (sc2tog) to close any gaps seamlessly.
Newer to crochet garments? Build your confidence first with our free crochet patchwork sweater pattern, made from simple blocked squares in sizes XS–4XL.
Ready to cast on? Pin this crochet Fair Isle yoke sweater pattern for later and tag us when you start — we’d love to see your color combination.