Free Crochet Pumpkin Hat Pattern (Newborn to Adult Sizes)
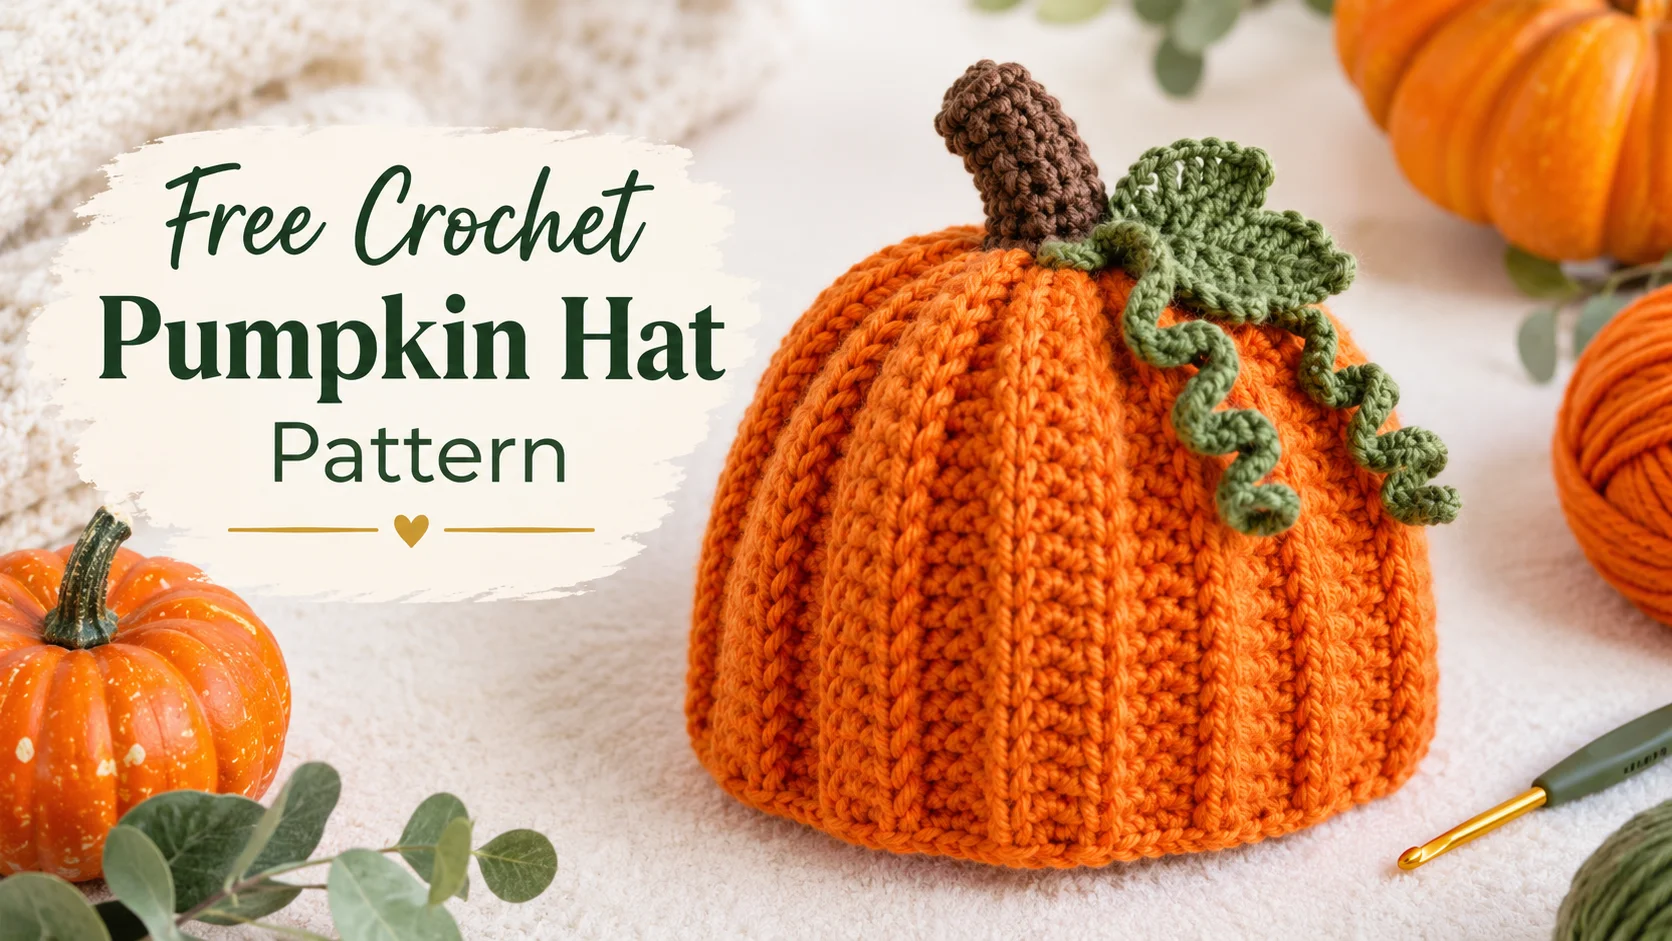
Looking for a crochet pumpkin hat you can finish in an afternoon? This free crochet pumpkin hat pattern uses one easy stitch, worsted weight yarn, and a ribbed rectangle that folds into real pumpkin ridges. It is a crochet pumpkin hat baby to adult pattern, so you can make matching fall crochet beanies for the whole family or a sweet newborn photo prop.
Table of Contents
Pattern at a Glance
| Detail | Specification |
|---|---|
| Skill level | Easy / confident beginner |
| Sizes included | Newborn, 3–6 Months, Toddler (1–3 yrs), Child/Teen, Adult Medium |
| Yarn weight | Worsted weight (#4 Medium) |
| Hook size | 5.0 mm (US H/8) for the hat; 4.0 mm (US G/6) for the stem and vine |
| Construction | Worked flat as a textured ribbed rectangle (sideways, in back loop half double crochet), then seamed and gathered at the crown |
| Estimated time | 1 to 2.5 hours, depending on size |
Materials Needed for Your Crochet Pumpkin Hat
Recommended Yarn & Yardage Requirements
Choose a smooth worsted weight (#4) yarn in pumpkin orange, plus a little brown for the stem and green for the vine and leaf. Approximate yardage:
- Newborn: 80 yds orange, 15 yds brown/green
- 3–6 Months: 95 yds orange, 15 yds brown/green
- Toddler: 130 yds orange, 20 yds brown/green
- Child/Teen: 160 yds orange, 20 yds brown/green
- Adult Medium: 190 yds orange, 25 yds brown/green
Best Yarn Alternatives
100% acrylic holds its shape best because it springs back after stretching, so the ribbing on your crochet pumpkin hat stays crisp wash after wash. Cotton has little stretch, which makes it a poor choice for the hat body, but it creates a stiffer stem that stands up straight.
Notions & Tools Checklist
- 5.0 mm (US H/8) and 4.0 mm (US G/6) crochet hooks
- Yarn needle, measuring tape, and sharp scissors
- Stitch marker and a little polyfill for the stem
- Optional: cinnamon stick or leather tag (adult and older-child hats only)
Pumpkin Hat Size Chart & Gauge Swatch
Gauge Swatch (Do Not Skip!)
Before starting your crochet pumpkin hat, ch 20, hdc in the 3rd ch from hook and in each ch across (18 hdc). Ch 2, turn, and hdc BLO across for 13 more rows. Measure the center without stretching: 14 sts x 10 rows = 4 in (10 cm).
- Too tight (more than 14 sts in 4 in): go up to a 5.5 mm (US I/9) hook.
- Too loose (fewer than 14 sts in 4 in): drop to a 4.5 mm (US 7) hook.
- Stitches match but rows don’t: keep your hook and simply work more or fewer rows in Step 1 until the piece reaches the target length.
Head Circumference & Finished Hat Dimensions Table
Measure around the head just above the eyebrows and ears. Each crochet pumpkin hat size includes about 1–3 in of negative ease, because back loop ribbing stretches.
| Size | Fits Head Circumference | Finished Hat Width (Flat) | Finished Height |
|---|---|---|---|
| Newborn | 13–14 in (33–36 cm) | 6.0 in (15 cm) | 5.5 in (14 cm) |
| 3–6 Months | 14–16 in (36–41 cm) | 6.75 in (17 cm) | 6.0 in (15 cm) |
| Toddler (1–3 yrs) | 18–19 in (46–48 cm) | 8.0 in (20 cm) | 7.0 in (18 cm) |
| Child / Teen | 19–21 in (48–53 cm) | 8.75 in (22 cm) | 7.75 in (20 cm) |
| Adult Medium | 21–22.5 in (53–57 cm) | 9.5 in (24 cm) | 8.5 in (21.5 cm) |
Head between 16 and 18 in (roughly 6–18 months)? Choose the Toddler size; the ribbing stretches to fit.
Crochet Abbreviations & Stitch Guide (US Terms)
- ch – chain
- sl st – slip stitch
- sc – single crochet
- hdc – half double crochet
- dc – double crochet
- inc – 2 sc in the same stitch
- BLO – back loop only
- MR – magic ring
- rnd – round
- st(s) – stitch(es)
How to Create the Deep Pumpkin Ridges
Working every hdc in the back loop only (BLO) leaves a bar of unworked front loops on each row, which creates elastic accordion folds that resemble authentic pumpkin ribs without any cabling. Because the rows run from brim to crown, those ridges gather neatly at the top of your crochet pumpkin hat.
Step-by-Step Pumpkin Hat Instructions
Sizes are written as Newborn (3–6 Months, Toddler, Child/Teen, Adult Medium). Use the 5.0 mm hook and orange yarn for the hat body.
Step 1 – Crocheting the Hat Body
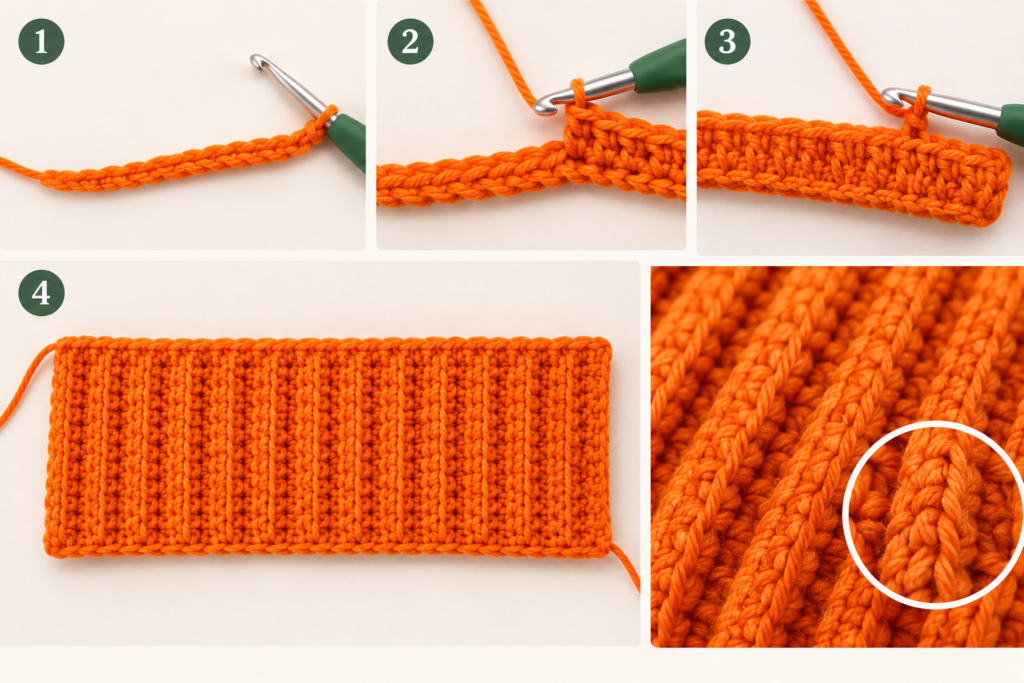
Foundation: Ch 21 (23, 27, 29, 32).
Row 1: Hdc in the 3rd ch from hook and in each ch across. Turn. 19 (21, 25, 27, 30) hdc.
Row 2: Ch 2 (does not count as a st), hdc BLO in each st across. Turn.
Rows 3–30 (34, 40, 44, 48): Repeat Row 2.
Fasten off, leaving a 30 in (75 cm) tail for seaming. Relaxed, the rectangle should measure about 12 (13.5, 16, 17.5, 19) in along its long side.
Step 2 – Seaming the Tube and Closing the Crown
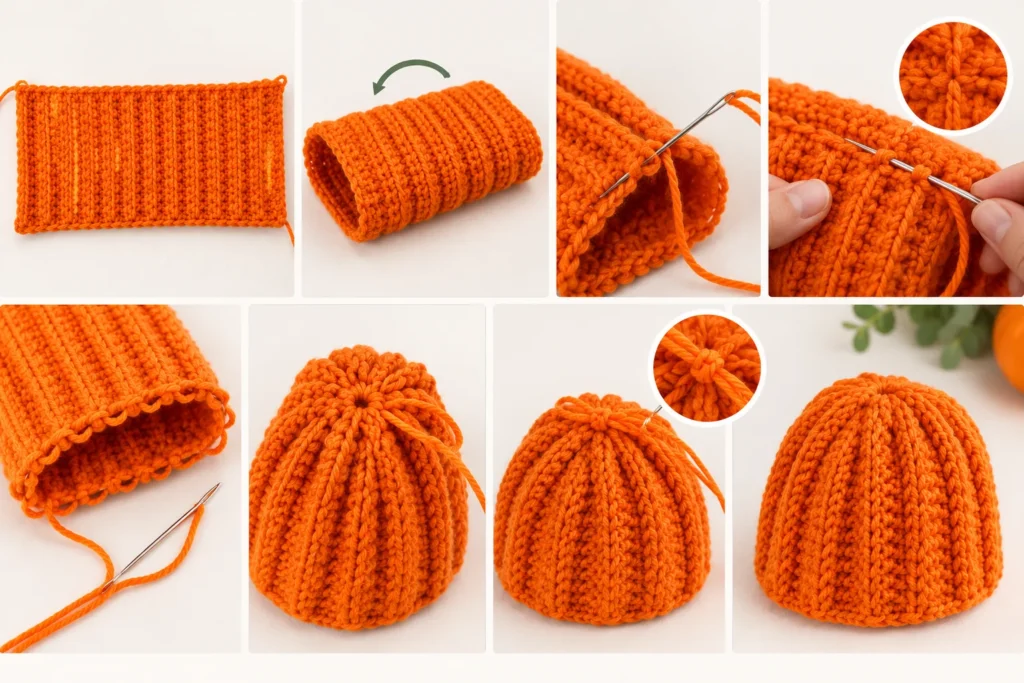
Fold the rectangle so the first and last rows meet. Seam them with the mattress stitch for an invisible join, or work a slip stitch seam from the wrong side for a faster, slightly raised one.
Next, thread a yarn needle with a fresh strand of orange. Work a running stitch through the end of every row around one open edge (this becomes the crown), pull tight to cinch it closed, wrap the yarn around the gathered point twice, knot it, and weave the end in inside the hat. Turn the hat right side out.
Step 3 – The 3D Pumpkin Stem
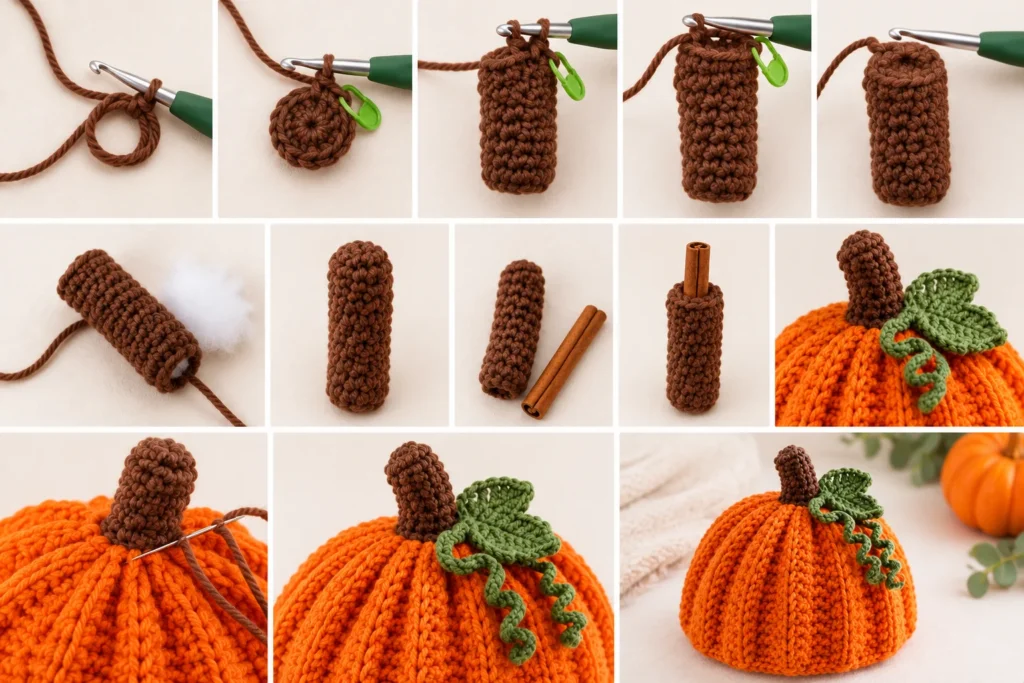
Using the 4.0 mm hook and brown yarn, work in continuous rounds (do not join) and mark the first st of each rnd.
Rnd 1: 8 sc in MR. (8)
Rnds 2–5 (2–5, 2–6, 2–6, 2–7): Sc in each st around. (8)
Next rnd: Inc in each st around. (16)
Next rnd: Sc in each st around. (16) Sl st in the next st and fasten off, leaving an 18 in (45 cm) tail.
Stuff the stem lightly with polyfill so it stands tall. For a rustic, fragrant stem on an adult or older-child hat, slide a 2–3 in cinnamon stick into the tube instead of stuffing it, then sew the stem on with the stick fully enclosed. Hats with a cinnamon stick are spot-clean only.
Step 4 – Crocheting the Curly Tendril & Leaf Toppers
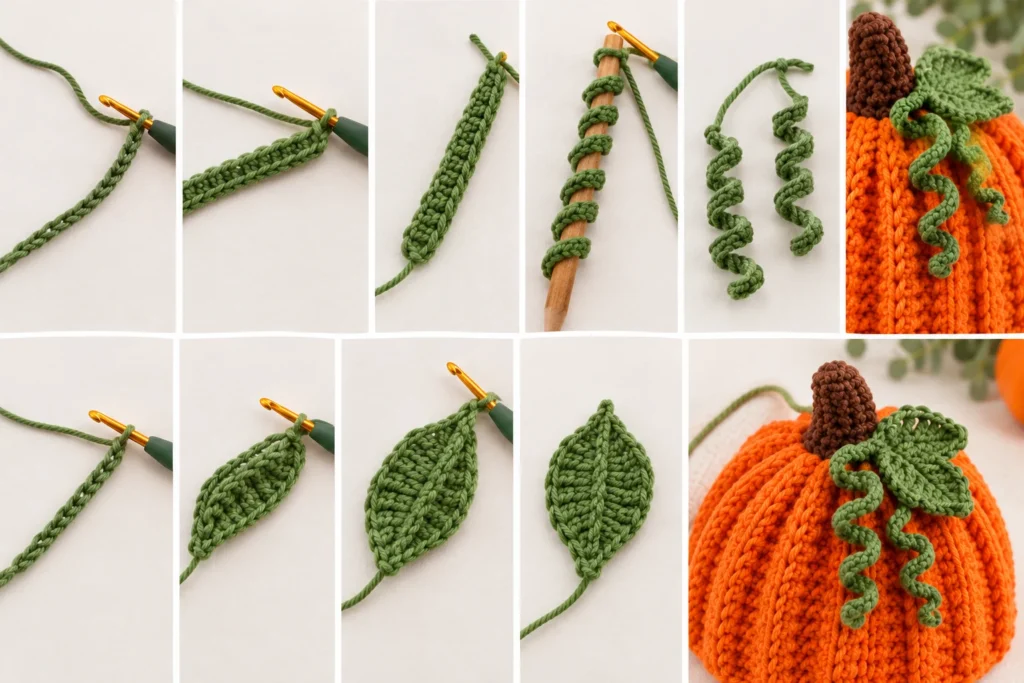
Using the 4.0 mm hook and green yarn:
Tendril (make 2): Ch 21. Work 3 sc in the 2nd ch from hook and 3 sc in each ch across (60 sc). Fasten off, leaving a 6 in tail. The extra stitches force the strip into a spiral; wrap it around a pencil for tighter curls.
Leaf (make 1): Ch 8. Sl st in the 2nd ch from hook, sc, hdc, dc, hdc, sc, then 3 sc in the last ch. Working along the other side of the foundation chain: sc, hdc, dc, hdc, sc, then sl st to the first sl st. Fasten off, leaving a 6 in tail.
Step 5 – Assembly & Finishing Touches
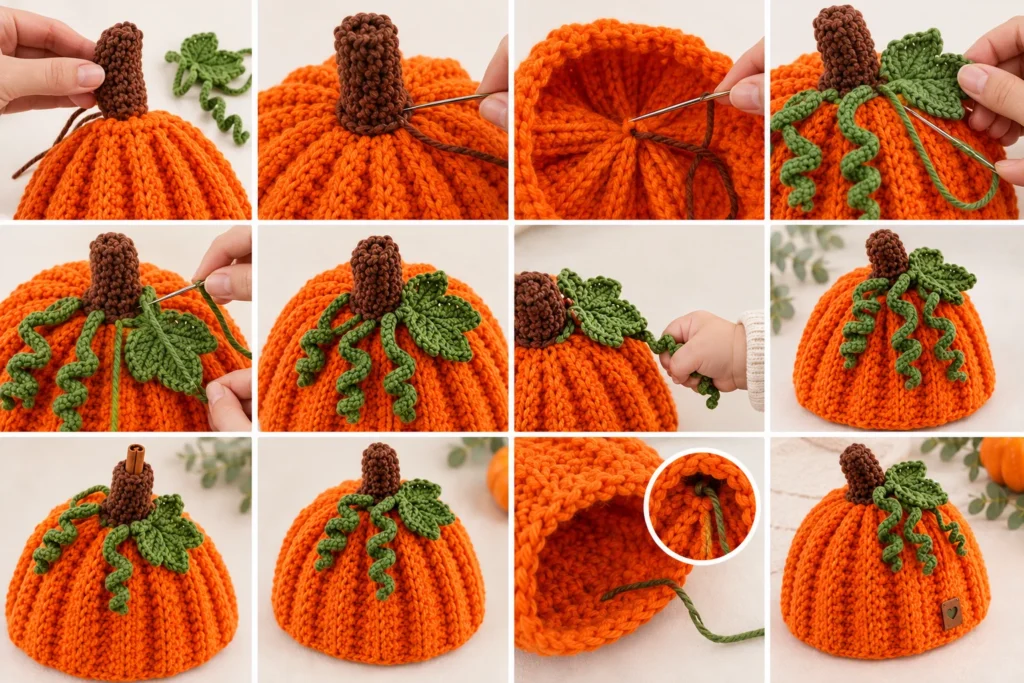
Center the stem over the gathered crown. Using the stem’s tail, whipstitch every st of its base round to the hat, then pass the needle through the cinched crown yarn twice and knot firmly inside. Tuck the tendril and leaf tails under the stem base and sew them down with several overlapping stitches.
Finish with a firm tug test: the stem and tendrils should stay put under little-hand pulling. For babies and toddlers, skip the cinnamon stick and leather tag, double-stitch every attachment, and never leave a baby to sleep in the finished crochet pumpkin hat.
Troubleshooting & FAQs
Why is my crochet pumpkin hat curling or too stiff?
Tight tension is the usual cause. Go up one hook size (for example, 5.0 mm to 5.5 mm), relax your grip on the yarn, and redo the gauge swatch; a stiff fabric will measure more than 14 sts per 4 in. If the brim still curls, dampen it lightly, shape it, and let it dry flat.
Can I make this pumpkin hat using bulky (weight 5 or 6) yarn?
Yes. Switch to a larger hook, such as 6.5 mm (US K/10.5) for weight 5, and reduce both the foundation chain and the total number of rows by about 30%. For the Toddler size, ch 27 becomes about ch 19 and 40 rows becomes about 28. Swatch first to confirm the fit.
How do I adjust this pattern for slouchy vs. fitted beanie styles?
The pattern as written makes a fitted beanie. For a slouchy brim, add 1.5–2 in of chains (about 5–7 chains) to the starting row and keep the row count the same, so the head fit does not change.
What is the best way to wash a crochet pumpkin hat?
Hand-wash in cold water with mild soap, press out the water gently without wringing, reshape, and lay flat to dry. This preserves the stem’s structure. Spot-clean only if your hat has a cinnamon stick.
Happy stitching! If you make this free crochet pumpkin hat pattern, share your finished crochet pumpkin hat in the comments.