Crochet Crossbody Bag Pattern: Free Step-by-Step Tutorial
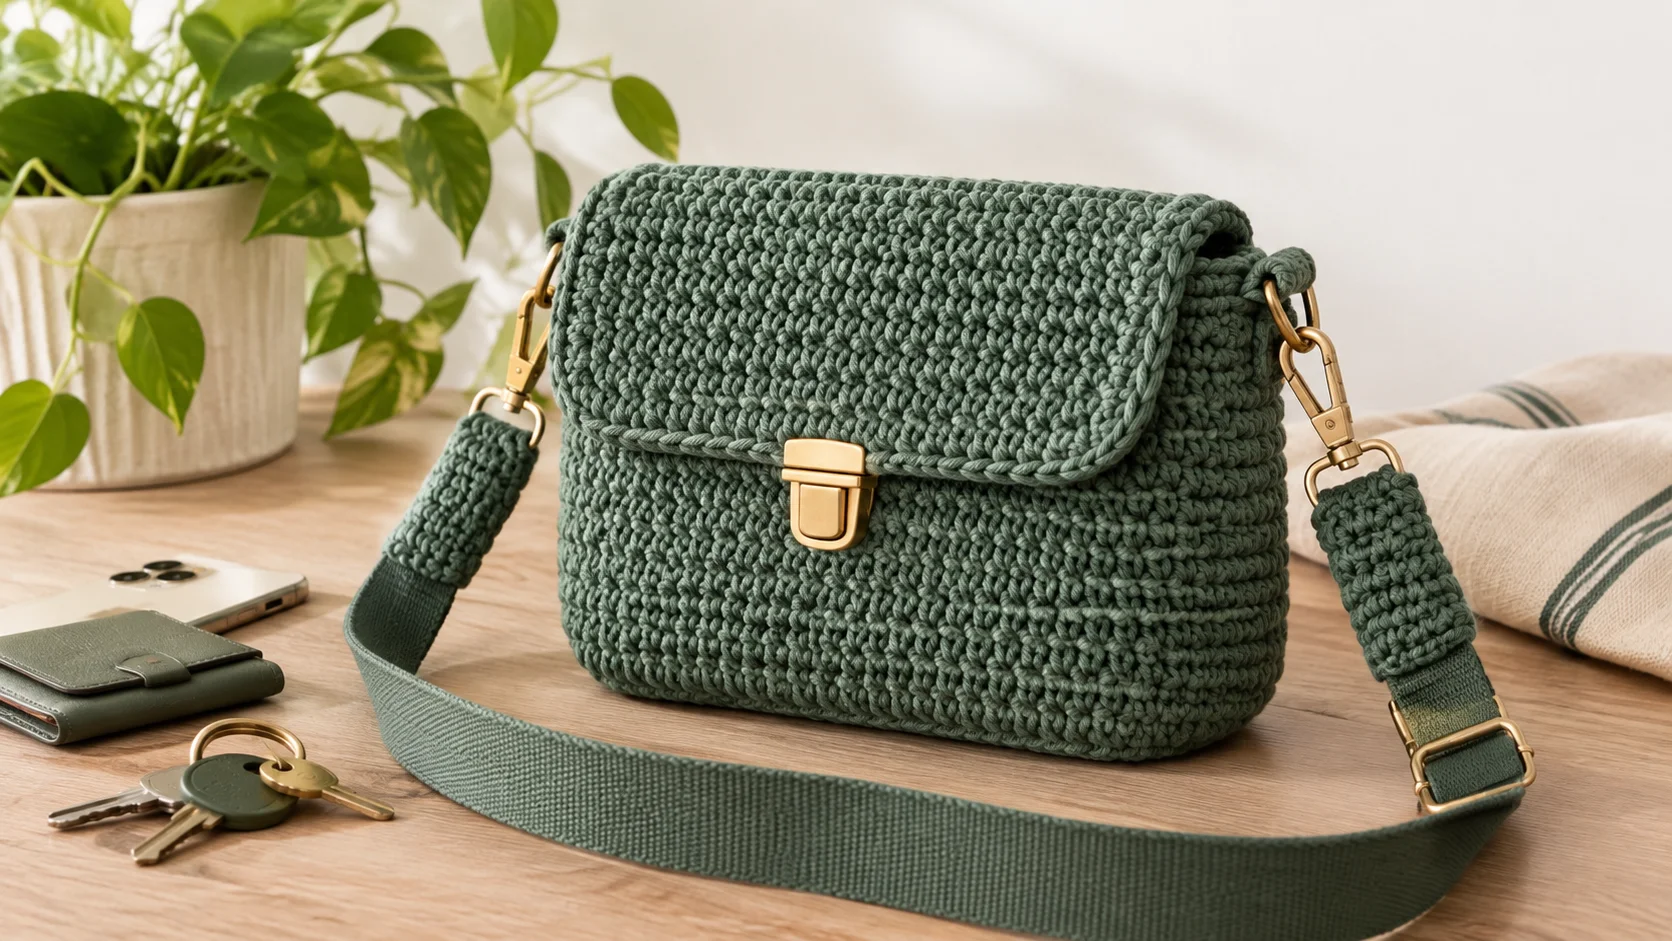
Looking for a crochet crossbody bag pattern that holds your phone, wallet, and keys without drooping into a stretched-out pouch? This free modern crochet crossbody bag pattern uses dense waistcoat stitch, a structured oval base, and a webbing-reinforced strap that stays exactly where you put it. It doubles as a beginner crossbody bag tutorial: every round has an exact stitch count, every technique is explained, and the most common problems are solved before you meet them. Grab some cotton and let’s make a handmade crossbody bag you’ll carry every day.
Table of Contents
Quick Pattern Snapshot: Your Crochet Crossbody Bag at a Glance
| Spec | Details |
|---|---|
| Skill Level | Advanced beginner |
| Finished Dimensions | 8.5″ wide × 6.5″ tall × 2″ deep, flap closed (fits an iPhone Pro Max, keys, and a slim wallet) |
| Strap Length | 48″ (easy to resize: add or remove 18 rounds per 4″) |
| Gauge | 16 sts × 18 rows = 4″ in waistcoat stitch (center single crochet) with a 4.0 mm hook |
| Time to Complete | ~4–5 hours, strap included |
| Key Technique | Waistcoat stitch: dense, hole-free, and sag-resistant |
Materials & Yarn Selection for This Crochet Crossbody Bag Pattern
Best yarn: 100% mercerized cotton or recycled cotton cord. Acrylic stretches under weight and slowly sags. Cotton has far less elasticity, so a structured crochet purse keeps its shape through daily use.
- Yarn: about 330 yds (300 m) of worsted weight (#4) cotton: roughly 215 yds for the bag and 115 yds for the strap cover. Buy at least 350 yds (320 m) to be safe.
- Hook: 4.0 mm (US G/6). Tip: go 0.5 mm smaller than the yarn label suggests. The tighter, denser fabric holds its shape without needing a fabric lining.
- Notions: 2 swivel lobster clasps (1.5″, with a ¾″ eye), 2 D-rings (1″), 1 magnetic snap, 50″ of ¾″ cotton webbing or twill tape, tapestry needle, stitch markers, and a 2″ felt square (snap backing).
Yarn Substitution Comparison
| Material | Durability | Washability | Stretch Resistance | Best For |
|---|---|---|---|---|
| Mercerized cotton | ★★★★☆ | ★★★★★ | ★★★★☆ | Daily-use bags |
| Paper raffia | ★★☆☆☆ | ★☆☆☆☆ (spot clean) | ★★★★★ | Structured summer clutches |
| Braided poly cord | ★★★★★ | ★★★★☆ | ★★★★☆ | Heavy loads and rainy climates |
Stitch Guide & Abbreviations (US & UK Cross-Reference)
This beginner crossbody bag tutorial uses US terms. UK crocheters, note the big trap: a US single crochet is a UK double crochet.
| Abbreviation | US Term | UK Equivalent |
|---|---|---|
| ch | chain | chain (ch) |
| sl st | slip stitch | slip stitch (ss) |
| sc | single crochet | double crochet (dc) |
| dc | double crochet | treble crochet (tr) |
| sc2tog | single crochet 2 together | double crochet 2 together (dc2tog) |
| BLO | back loop only | back loop only (BLO) |
| st(s) | stitch(es) | stitch(es) |
| yo | yarn over | yarn over hook (yoh) |
| rnd | round | round |
| RS / WS | right side / wrong side | right side / wrong side |
Special Stitch Deep Dive: Waistcoat Stitch
Waistcoat stitch (also called center single crochet) is a single crochet worked into the middle of the “V” on the stitch below, instead of under both top loops. That placement builds a thick, knit-look fabric with no gaps, which is exactly what a crossbody bag needs to stay structured.
- Find the V at the top of the stitch below.
- Insert your hook from front to back through the center of the V, between its two legs.
- Yo and pull up a loop (2 loops on hook).
- Yo and pull through both loops.
Tip: waistcoat stitch feels tight at first, so work loosely and insert the hook the same way every time for even texture.
Step-by-Step Written Crochet Crossbody Bag Pattern
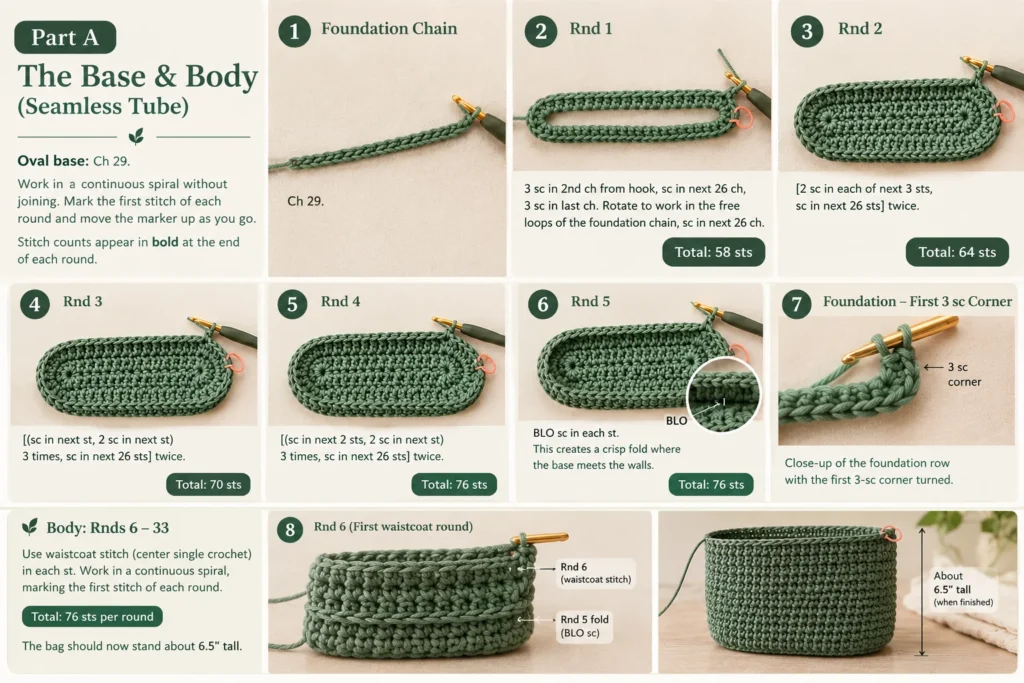
Work in a continuous spiral without joining. Mark the first stitch of each round and move the marker up as you go. Stitch counts appear in bold at the end of each round.
Part A: The Base & Body (Seamless Tube)
Oval base: Ch 29.
- Rnd 1: 3 sc in 2nd ch from hook, sc in next 26 ch, 3 sc in last ch. Rotate to work in the free loops of the foundation chain, sc in next 26 ch. [Total: 58 sts] Place a marker in the first st.
- Rnd 2: [2 sc in each of next 3 sts, sc in next 26 sts] twice. [Total: 64 sts]
- Rnd 3: [(sc in next st, 2 sc in next st) 3 times, sc in next 26 sts] twice. [Total: 70 sts]
- Rnd 4: [(sc in next 2 sts, 2 sc in next st) 3 times, sc in next 26 sts] twice. [Total: 76 sts]
- Rnd 5: BLO sc in each st. This creates a crisp fold where the base meets the walls. [Total: 76 sts]
Body:
- Rnds 6–33: Waistcoat stitch in each st. [Total: 76 sts per round] The bag should now stand about 6.5″ tall.
Part B: The Front Flap (Minimalist Fold)
Work the flap on the back panel only, in rows of regular single crochet.
- Setup: From your marker, sl st in next 8 sts. This centers the flap on the back.
- Row 1: Ch 1, sc in next 34 sts, ch 1, turn. [Total: 34 sts]
- Rows 2–6: Sc in each st, ch 1, turn. [Total: 34 sts]
- Rows 7–10: Sc2tog, sc across to last 2 sts, sc2tog, ch 1, turn. On Row 10, skip the ch 1 and turn, then fasten off. [Total after Row 10: 26 sts]
Prefer a zipper? Skip the flap, work one round of sc around the opening, and sew an 8″ zipper to the inside edge.
Part C: Adding Structure (The Secret to No-Sag Crochet)
Slip stitch has almost no give, so a slip stitch edge locks the opening in place.
Join yarn at the top corner on one side of the flap, where Row 1 meets the bag. Sl st loosely in each of the 42 unworked sts across the front opening. Then sl st 10 evenly down the flap side, 26 across the flap bottom, and 10 up the other side. Join to the first sl st and fasten off. [Total: 88 sl sts]
The Zero-Stretch Crossbody Strap: The Part Most Patterns Skip
The Problem
Standard chain-and-single-crochet straps often grow 30–40% once a phone, wallet, and keys are inside. Every stitch is a tiny loop of yarn, and gravity pulls those loops open a little more each day. A bag that started at a comfortable hip-height drop ends up bumping your knees.
The 3 Best Anti-Stretch Solutions (Ranked)
Ranked from most decorative to most bulletproof:
- Romanian point lace cord. A dense, tubular cord with an elevated, rope-like look. It is much firmer than a plain chain but still has some give, so sew it along a strip of webbing for heavy loads.
- Thermal stitch belt. A thick, flat strap in dense center single crochet. It has very little give and suits lighter loads.
- Crocheting over a twill tape or cotton webbing core. The ultimate structural fix. The webbing carries the load, and the crochet is purely decorative, so stretch is effectively zero.
The pattern below combines options 2 and 3: a waistcoat-stitch cover that slides over a webbing core. If you love Romanian cord, make it 46″ long and stitch it along the webbing instead.
Step-by-Step: Waistcoat Tube Strap with Webbing Core
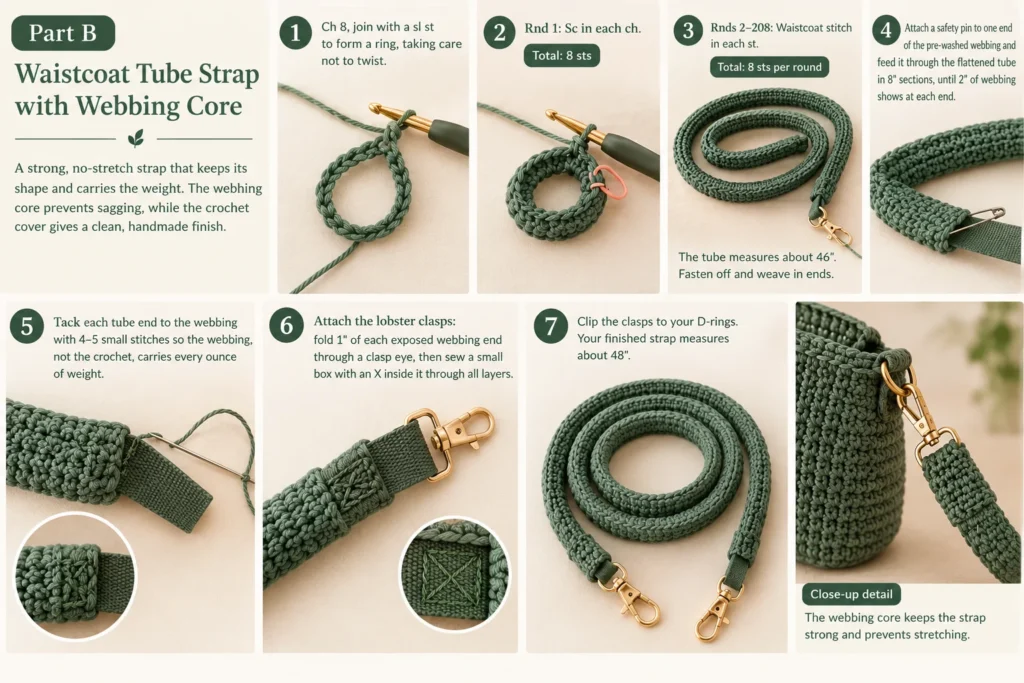
- Ch 8, join with a sl st to form a ring, taking care not to twist.
- Rnd 1: Sc in each ch. [Total: 8 sts]
- Rnds 2–208: Waistcoat stitch in each st. [Total: 8 sts per round] The tube measures about 46″. Fasten off and weave in ends.
- Attach a safety pin to one end of the pre-washed webbing and feed it through the flattened tube in 8″ sections, until 2″ of webbing shows at each end.
- Tack each tube end to the webbing with 4–5 small stitches so the webbing, not the crochet, carries every ounce of weight.
- Attach the lobster clasps: fold 1″ of each exposed webbing end through a clasp eye, then sew a small box with an X inside it through all layers.
- Clip the clasps to your D-rings. Your finished strap measures about 48″.
Finishing, Assembly & Hardware Integration
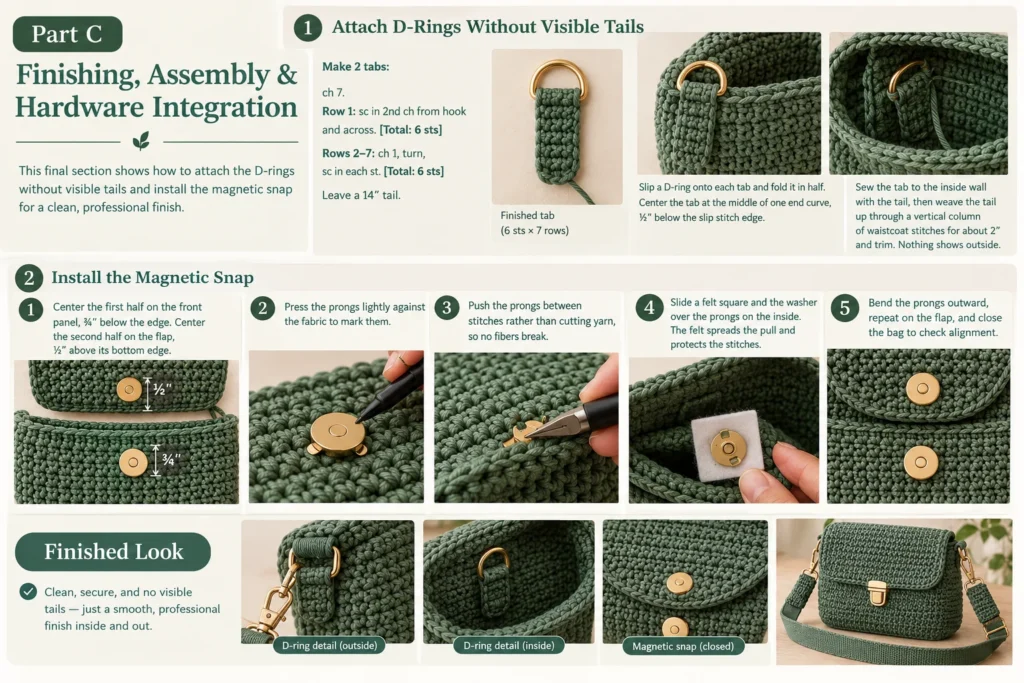
Attach D-Rings Without Visible Tails
Make 2 tabs: ch 7. Row 1: sc in 2nd ch from hook and across. [Total: 6 sts] Rows 2–7: ch 1, turn, sc in each st. [Total: 6 sts] Leave a 14″ tail.
Slip a D-ring onto each tab and fold it in half. Center each tab at the middle of one end curve, ½″ below the slip stitch edge. Sew the tab to the inside wall with the tail, then weave the tail up through a vertical column of waistcoat stitches for about 2″ and trim. Nothing shows on the outside.
Install the Magnetic Snap
- Center the first half on the front panel, ¾″ below the edge. Center the second half on the flap, ½″ above its bottom edge.
- Press the prongs lightly against the fabric to mark them.
- Push the prongs between stitches rather than cutting yarn, so no fibers break.
- Slide a felt square and the washer over the prongs on the inside. The felt spreads the pull and protects the stitches.
- Bend the prongs outward, repeat on the flap, and close the bag to check alignment.
Optional: 15-Minute Sew-Free Fabric Lining
- Trace your bag base on cotton fabric and cut the oval ¼″ larger all around. Cut a 20″ × 7″ strip for the walls.
- Fold the strip into a tube with a ½″ overlap and fix the seam with fabric glue or iron-on hem tape.
- Snip small ¼″ notches around the oval’s edge, then glue it to the tube bottom.
- Fold the top edge down ½″ and press or glue it flat.
- Slide the lining into the bag and secure its top edge just under the slip stitch edging.
Glue vs. backstitch: fabric glue takes about 15 minutes plus drying time, but it is not ideal for frequent washing. Backstitching the lining to the inner edge with matching thread adds about 10 minutes and survives repeated hand washing.
Common Mistakes & Troubleshooting
Why is my crochet bag curling at the edges?
Curling is a tension problem. If the walls curl inward, you are probably working too tightly, so try a 4.5 mm hook for a round or two and compare against your gauge swatch. If the base ripples like a ruffle, recount your increase rounds. Too many increases ruffle, and too few make the base dome.
How do I clean and wash a handmade cotton crossbody bag?
Hand wash in cool water with mild soap, squeeze gently (never wring), and press out the water in a towel. Reshape the bag, stuff it with a rolled towel, and dry it flat away from direct sun. Keep the magnetic snap out of long soaks. Pre-wash cotton webbing before threading it, because it can shrink.
Can I use acrylic yarn instead?
You can, but expect trade-offs. Acrylic stretches under weight, fuzzes and pills with friction, and the strap will lengthen over time. If you must use it, drop to a 3.5 mm hook, line the bag, and keep the webbing core in the strap.
Frequently Asked Questions
How long should a crochet crossbody bag strap be?
An average crossbody strap is between 45 to 50 inches (114–127 cm), giving a bag drop of roughly 20 to 24 inches at hip level. For taller or petite frames, adjust by measuring from shoulder to opposite hip.
Do I need to line a crochet crossbody bag?
If you use a dense stitch like the thermal stitch or waistcoat stitch with a 3.5 mm–4 mm hook, a lining is optional. If you use open stitches (granny squares, mesh, double crochet), a lining is required to prevent stretching and small items from falling out.
What is the best yarn for a daily-use crochet bag?
100% mercerized cotton or braided polyester craft cord. Unlike wool or acrylic, cotton fibers stretch far less, hold sharp stitch definition, and can withstand abrasive daily wear.
Final Thoughts
You now have a complete crochet crossbody bag pattern with a strap that won’t quit. Make it in cotton for everyday carry, or try braided poly cord for rainy days. Save the pattern, share your finished bag in the comments, and tell us which hardware finish you chose.