
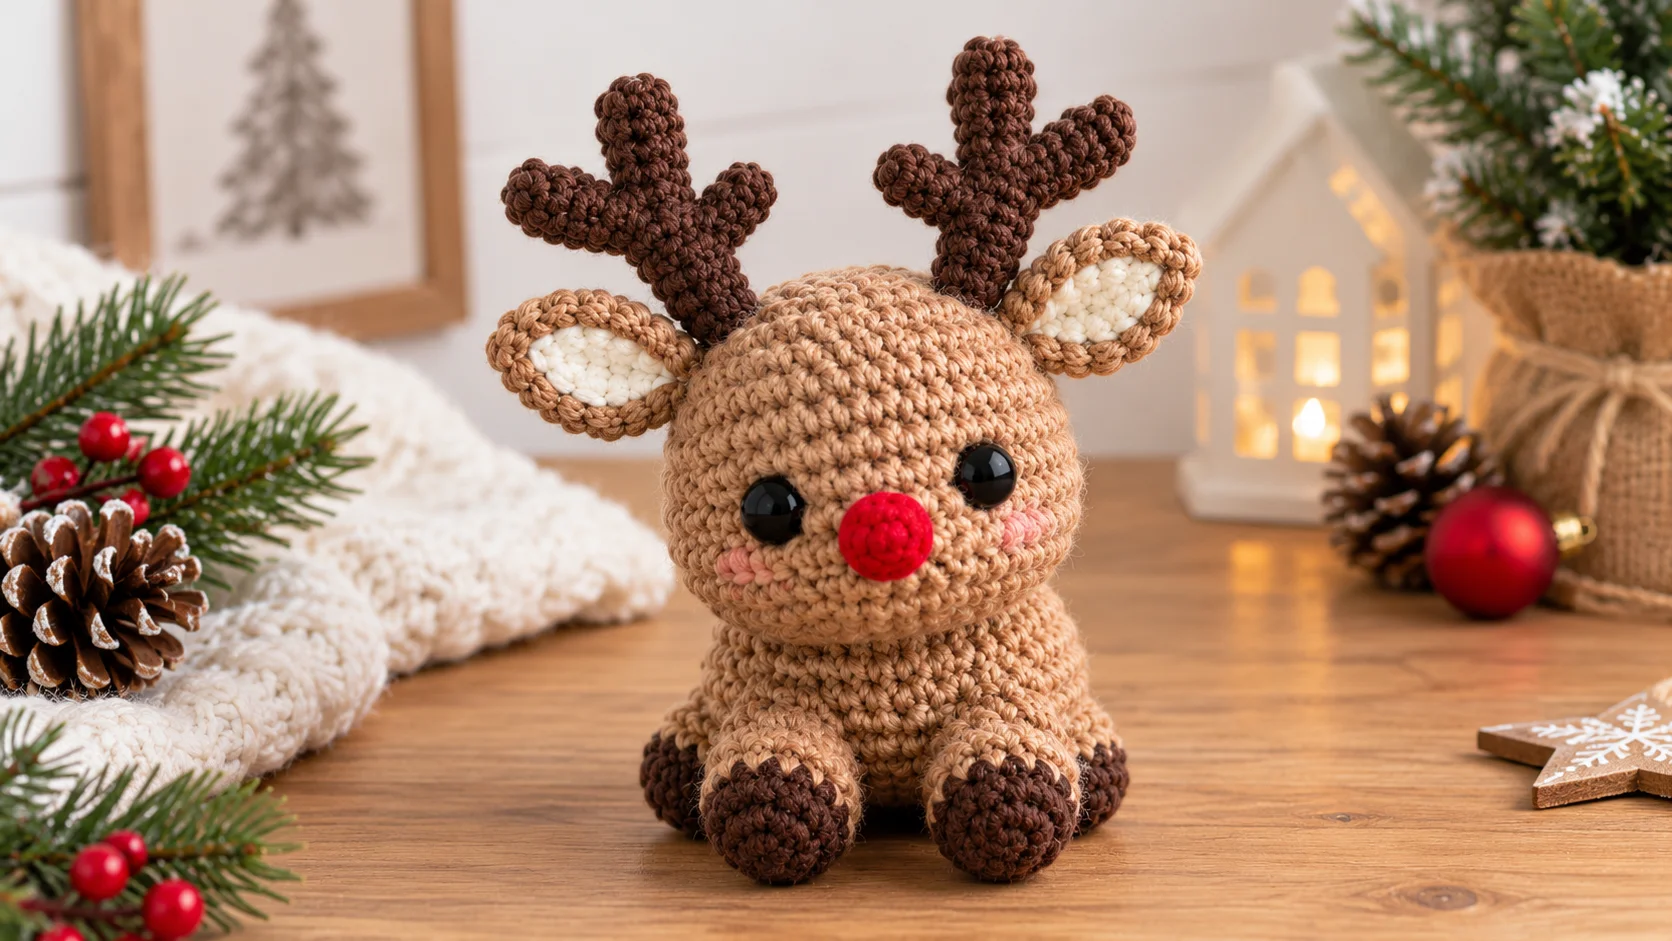
Free Pocket Reindeer Crochet Pattern (Quick & No-Sew)
Want a pocket reindeer crochet pattern you can finish in one cozy evening, with no sewing at all? This free pocket reindeer crochet pattern works the antlers, ears, and little hooves right into the body, so you go from magic ring to a finished crochet reindeer amigurumi in under an hour.
Table of Contents
Quick Snapshot: Pocket Reindeer Crochet Pattern at a Glance
- Skill Level: Advanced Beginner
- Project Time: 35–50 minutes
- Finished Size: ~3.2 inches (worsted weight) to 5.5 inches (super bulky chenille)
- Construction: 100% no-sew (antlers, ears, and limbs worked directly into the body)
- Key Techniques: Magic ring, working in continuous rounds, bobble stitch (for feet)
The Ultimate 45-Minute Holiday Make
Traditional amigurumi means stitching on tiny ears, antlers, and legs, the fiddly finishing that sends many half-made toys to the bottom of a project bag. This pocket reindeer crochet pattern solves that pain point. Surface crochet and integrated bobble stitches build every feature as you work, so there is nothing left to sew on.
It is also a genuinely quick crochet gift. At roughly 30 yards of yarn per worsted-weight reindeer, this free pocket reindeer crochet pattern is a budget-friendly way to use up stash yarn for classroom swaps, secret Santa exchanges, and holiday markets.
3-in-1 versatility:
- Pocket pal / fidget plushie: Work it in super bulky chenille yarn for a squishy, hand-sized buddy that fits in any coat pocket.
- Holiday tree ornament: Make it in worsted weight and add a twine loop.
- Bag charm / stocking stuffer: Attach a lobster clasp keychain and clip it to a backpack or zipper pull.
Because the pocket reindeer crochet pattern scales with your yarn weight, you can crochet a whole herd in different sizes and colors from one set of instructions.
Materials, Tools & Sizing Chart
Everything you need for this pocket reindeer crochet pattern fits in a small project bag, and most of it is probably in your stash already.
Supplies Checklist
- Main body yarn: Bulky chenille (#6) for a plush buddy, or worsted acrylic/cotton (#4) for ornaments and charms.
- Accent yarn: Small amounts of dark brown (antlers) and red (nose).
- Crochet hook: Sized to your yarn (see the chart below). Aim for snug stitches so fiberfill can’t peek through.
- Eyes: 8 mm or 10 mm safety eyes, or black embroidery thread as a baby-safe alternative.
- Notions: Polyester fiberfill stuffing, stitch markers, and a yarn needle.
Yarn Substitution & Sizing Reference Table
Use this chart to pick the right hook and predict the finished size of your crochet reindeer amigurumi.
| Yarn Type | Recommended Hook | Finished Height | Best Use Case |
|---|---|---|---|
| Super Bulky #6 (Chenille) | 4.5 mm / 5.0 mm | ~5.5 inches | Squishy plushie, pocket buddy |
| Worsted Weight #4 (Cotton/Acrylic) | 2.75 mm / 3.0 mm | ~3.2 inches | Tree ornament, backpack keychain |
| Sport Weight #2 | 2.0 mm | ~2.0 inches | Delicate festive garland, earrings |
Chenille or worsted? Chenille gives that velvety, huggable feel, but its pile hides stitch definition, so it suits plush pocket buddies best. Worsted cotton or acrylic shows off the bobble feet and antlers, holds its shape, and is easier to rip back if you slip. Sport weight is fiddly, so save it for garlands once you have made one larger reindeer. Whichever yarn you choose, the stitch counts in this pocket reindeer crochet pattern stay the same; only the hook and finished size change.
Important Pattern Notes & Abbreviations
This pocket reindeer crochet pattern uses standard US terms and is worked in continuous rounds without joining. Mark the first stitch of every round with a stitch marker and treat that stitch as the back of the head. Numbers in [brackets] show your stitch count at the end of each round. Gauge is not critical, but your fabric should be dense: if you can see stuffing through the stitches, drop down a hook size.
- MR: Magic ring
- sc: Single crochet
- inc: Single crochet increase (2 sc in one st)
- invdec: Invisible decrease (insert the hook through the front loops only of the next 2 sts, yarn over, pull through both, yarn over, pull through the last 2 loops)
- bo: 4-dc bobble stitch, used for the no-sew hooves/legs: [yarn over, insert hook, yarn over, pull up a loop, yarn over, pull through 2 loops] 4 times in the same st, then yarn over and pull through all 5 loops
- hdc: Half double crochet
- ch: Chain / sl st: Slip stitch
Pro tension tip for chenille yarn: Chenille makes the squishiest version of this pocket reindeer crochet pattern, but it has a thin core that snaps when yanked, so let each loop slide up the hook and keep your yarn hand relaxed instead of pulling tight. Work every decrease as an invisible decrease through the front loops only; it closes the gaps that fluffy pile and fiberfill would otherwise squeeze through. Try not to rip out the same stitches more than twice, because the pile wears thin.
Step-by-Step Pocket Reindeer Pattern Instructions
Here is the complete free pocket reindeer crochet pattern, worked bottom-up in your main yarn unless told otherwise.
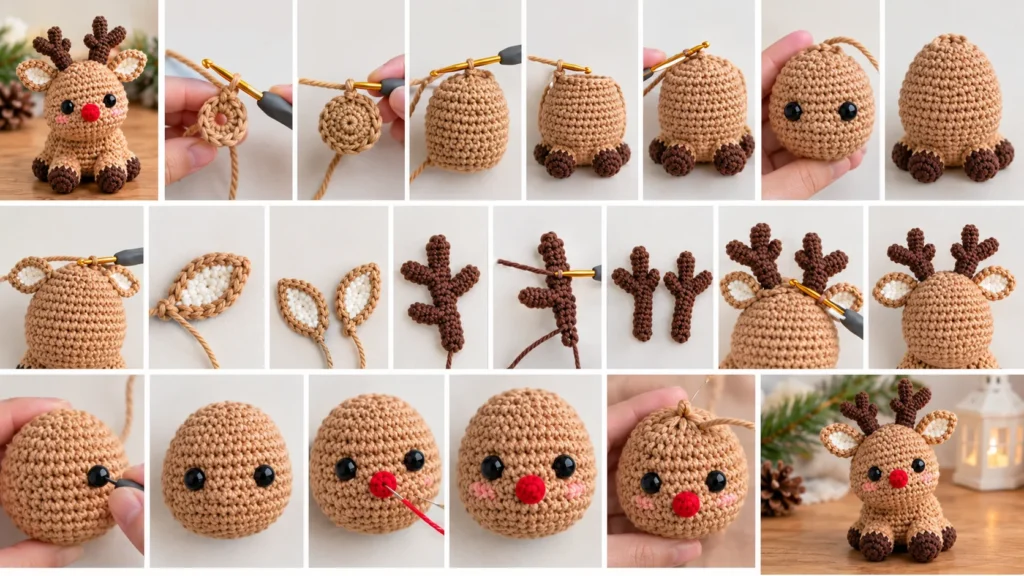
Step 1 – Head & Body (Worked Bottom-Up in Continuous Rounds)
- Rnd 1: 6 sc in MR [6]. (For chenille: ch 2, then work 6 sc in the 2nd ch from hook.)
- Rnd 2: inc in each st around [12]
- Rnd 3: (sc, inc) × 6 [18]
- Rnd 4: (sc 2, inc) × 6 [24]
- Rnd 5 (legs): (bo, sc 5) × 4 [24]. Each bobble forms a hoof, so no yarn is attached separately. Bobbles pop toward the inside, so push each one out to the front with your thumb.
- Rnd 6: (sc 3, inc) × 6 [30]
- Rnd 7: (sc 4, inc) × 6 [36]
- Rnds 8–11: sc in each st around [36]
Bobble tip: the bobble feet are the one new stitch in this pocket reindeer crochet pattern, so keep your loops relaxed enough for all five to slide off the hook. If a bobble flops, snug up the sc that follows it to lock it in place.
Safety eye placement: Insert the eyes between Rnds 9 and 10, 4 stitches apart, centered on the front of the face (directly opposite your marker). Fasten the washers before stuffing. Making this for a baby? Embroider the eyes instead.
- Rnd 12: (sc 4, invdec) × 6 [30]
- Rnd 13: (sc 3, invdec) × 6 [24]
- Rnd 14: (sc 2, invdec) × 6 [18]
Stuff firmly, shaping the base so the four bobble feet sit flat. Stitch check: 18 stitches remain, the body is stuffed, and your reindeer stands on four bobble feet.
Step 2 – Integrated Ears & Antlers (No-Sew Execution)
The ears and antlers are the heart of this no-sew pocket reindeer crochet pattern, and both are worked straight into the top rounds before you close the head.
- Rnd 15 (ears): sc in each st around [18], adding an ear in st 5 and st 14. For each ear: sc in the stitch, ch 4, sl st in the 2nd ch from hook, sc in the next ch, hdc in the last ch, then sl st in the same base stitch to anchor it. Ear stitches do not count toward your total.
- Rnd 16: (sc, invdec) × 6 [12]. Stuff the head firmly, then slip a stitch marker through your live loop and set the main yarn aside.
- Antlers (make 2): Join the brown yarn with a sl st in st 5 of Rnd 16, then ch 7. Working back down the chain, sl st in the 2nd ch from hook and the next ch; ch 3, sl st in the 2nd ch from hook and the next ch (first tine); sl st in the next 2 ch; ch 3, sl st in the 2nd ch from hook and the next ch (second tine); sl st in the last 2 ch, then sl st in the same stitch on the head. Fasten off and tuck the tail inside. Repeat in st 8.
Droopy antlers? Work each sl st through the back bump of the chain for a firmer branch, or drop half a hook size. For the chenille version, crochet the antlers with smooth brown worsted held double and a 4.0 mm hook.
Step 3 – Facial Details & Finishing Touches
- Rnd 17: Remove the marker, pick up your main yarn, and work invdec × 6 [6]. Making an ornament? Before this round, knot the ends of an 8-inch cord, tuck the knot inside the opening, and let the loop stand up between the antlers; Rnd 17 will lock it in.
- Closing: Fasten off, leaving an 8-inch tail. Thread it through the front loops only of the 6 remaining stitches, pull snug, then insert the needle down through the center and out the back to hide the end. Closing through the front loops only (the idea behind the ultimate finish) gives a smooth, rounded crown instead of a pointy head.
- Rudolph’s nose: With red yarn, embroider a French knot or a small satin stitch centered between the eyes, one round below eye level (Rnds 8–9). Weave in any remaining ends.
That is the whole pocket reindeer crochet pattern: one finished, completely no-sew reindeer. Stand it on its bobble feet and admire.
Craft Fair Pricing, Packaging & Safety Guidelines
Handmade reindeer are a natural fit for holiday markets, and a quick make like this pocket reindeer crochet pattern means a full table of stock takes a weekend, not a month.
Pricing formula: Add materials and packaging ($2–$3) to your labor (40 minutes at $6–$9 an hour, or about $4–$6). That gives a base price of $6–$9, which is also a fair wholesale price if a shop wants to stock your work. Double it for retail and you land at the $12–$18 typical market price for a crochet reindeer amigurumi. Adjust for your local yarn costs and wage goals.
Packaging concept: Attach a printable “Pocket Reindeer Adoption Card” with a name line, an adoption date, and care instructions (spot clean, air dry). Tie it on with ribbon, or tuck a cocoa packet into a cellophane bag for a ready-made gift. A named reindeer feels like a keepsake, not just another stocking stuffer.
Listing tip: When you list reindeer made from this pocket reindeer crochet pattern, photograph them beside a coin or pencil for scale, and state the yarn weight and finished size so buyers know whether they are getting an ornament or a plush.
Child safety alert: Safety eyes are a choking hazard for children under 3, even when locked on tightly. For infant toys, embroider the eyes with black yarn instead, and skip the twine loop and lobster clasp, which add cord and small-parts risks. If you sell to families, check the children’s product rules where you live (in the US, that means CPSIA testing and labeling). This is general information, not legal advice, so read your local rules before selling anything made from this pocket reindeer crochet pattern.
Frequently Asked Questions About Crocheting a Pocket Reindeer
These are the questions readers ask most about this pocket reindeer crochet pattern.
Can a total beginner make this pocket reindeer?
Yes, if you are comfortable with the magic ring, single crochet, and increases/decreases. The no-sew construction makes it easier than standard amigurumi. The bobble feet and chain antlers in this pocket reindeer crochet pattern are the only new moves, and both are explained stitch by stitch above.
Why does my chenille yarn keep shedding when starting the magic ring?
Chenille sheds under friction. Work 2 chains and crochet your first round directly into the second chain from the hook instead of pulling a tight magic ring. Pulling a magic ring tight drags the pile back and forth, which is what rubs it off.
How can I turn this pocket reindeer into a Christmas ornament?
Cut an 8-inch strand of gold cord, knot the ends, and thread it through the center of the reindeer’s head between the antlers before closing the final round. Choose the worsted weight version, and keep ornaments out of reach of small children.
Can I sell the finished plushies made with this pattern?
Yes, with designer credit guidelines. You may sell finished items made with this pocket reindeer crochet pattern as long as you credit the designer, link back to this post, and use your own photos. Please do not share, resell, or redistribute the pattern itself.
Ready to Crochet Your Herd?
Whether you hook one chenille pocket pal for yourself or a dozen worsted ornaments for the craft fair, this free pocket reindeer crochet pattern comes together fast and finishes clean. Try cream, caramel, or even candy-cane red for the body, and share your finished crochet reindeer amigurumi with fellow makers. Happy hooking!
One Comment