Free Crochet Snowgirl with a Pink Hat: Amigurumi Pattern
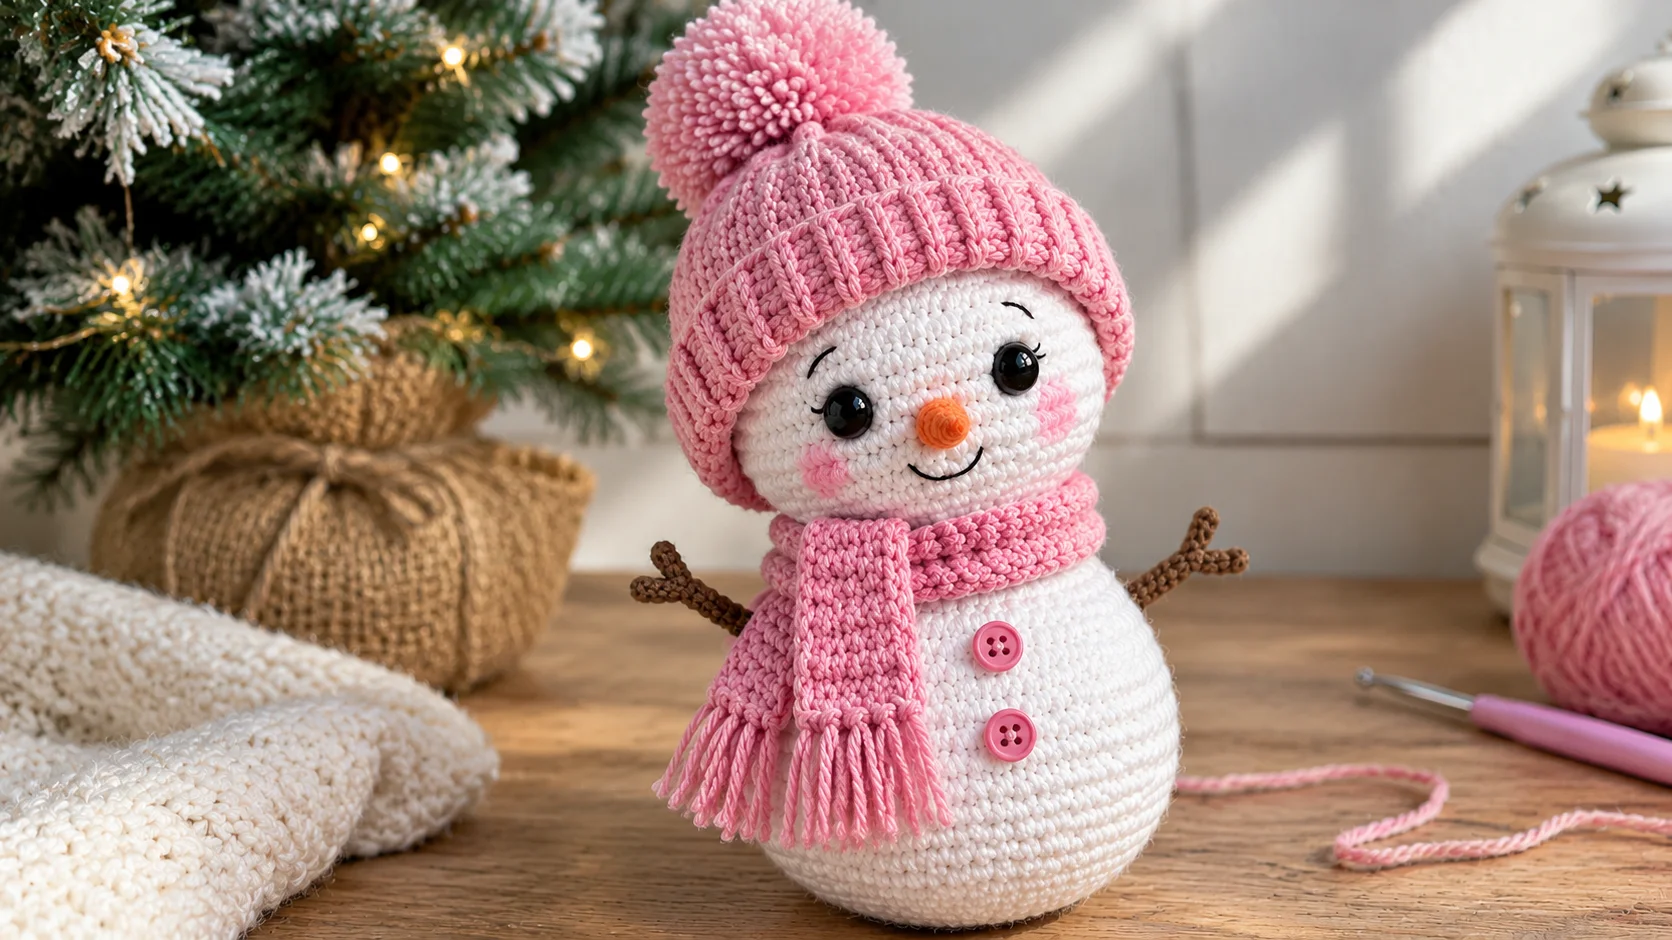
Every winter I hunt for a snow project that feels fresh, and this crochet snowgirl with a pink hat is my new favorite. She is worked from the top down in one piece, so you never sew a separate head onto a body. This is a crochet snowgirl pattern free from start to finish, with every round and stitch count written out. Think of it as an amigurumi snowgirl tutorial you can finish in one cozy afternoon.
Table of Contents
| Quick Facts | Details |
|---|---|
| Skill level | Advanced beginner |
| Time to complete | 1.5 to 2.5 hours |
| Finished size | About 5.5 inches (14 cm) tall |
| Yarn and hook | Worsted weight (#4) yarn, 3.25 mm (D/3) hook |
| Key stitch counts | Head 30 sts, neck 18 sts, body 42 sts, hat brim 36 rows |
| Terminology | US crochet terms |
| Download | Jump to Free Pattern · Print-Friendly PDF |
Most patterns ask you to crochet two spheres and sew them together, which leaves a bumpy seam and a wobbly neck. This one skips all that. You will use a magic ring, basic single crochet, and the invisible decrease for smooth shaping. By the end, your crochet snowgirl with a pink hat will sit upright, hold her head high, and look store-bought.
Materials & Tools Needed
Smooth worsted yarn and a small hook keep your tension tight, so the white stuffing never peeks through.
| Item | Specification / Type | Recommended Brand / Color |
|---|---|---|
| Yarn (body) | Worsted weight (#4) acrylic or cotton | Soft white, e.g. Bernat Super Value |
| Yarn (hat and scarf) | Worsted weight (#4) acrylic or cotton | Dusty pink, blush, or bubblegum pink |
| Yarn (nose and accents) | Worsted weight (#4) | Burnt orange, plus a short length of black |
| Crochet hook | 3.25 mm (D/3) or 3.5 mm (E/4) | Clover Amour ergonomic hook |
| Eyes | 8 mm or 9 mm safety eyes | Black, with secure plastic backs |
| Stuffing | Polyester fiberfill | Poly-Fil Premium |
| Notions | Yarn needle, stitch markers, scissors, black embroidery floss | Pink powder blush and a soft makeup brush |
Make a quick gauge swatch if you switch yarns. Ten single crochet stitches should measure about 2 inches (5 cm) wide. If yours is wider, drop down a hook size.
Choose a pink with strong contrast against the white body. A bold hat makes your crochet snowgirl with a pink hat pop in photos, which matters if you plan to share or sell your finished makes.
Pattern Abbreviations & Stitch Notes (US Terms)
| Abbreviation | Meaning |
|---|---|
| MR | Magic ring |
| SC | Single crochet |
| INC | Increase (2 SC in one stitch) |
| DEC | Invisible decrease (SC 2 together using front loops only) |
| BLO | Back loop only |
| SL ST | Slip stitch |
| CH | Chain |
| HDC | Half double crochet |
| [ ] | Total stitch count at the end of the round |
Pattern notes
- Work in continuous spirals. Do not join rounds unless a step says so.
- Place a stitch marker in the first stitch of each round and move it up as you go.
- “(3 SC, INC) x6” means repeat everything in the brackets six times.
- Stuff as you go, and pack the fiberfill firmly so she does not sag.
Invisible decrease in 3 steps
- Insert the hook through the front loop only of the next stitch, then the front loop only of the stitch after it.
- Yarn over and pull through both front loops.
- Yarn over and pull through the 2 loops on the hook.
Pull the magic ring tail tight after Round 1 until the center closes. Then weave the tail in so the ring cannot loosen later.
Free Crochet Snowgirl Pattern (Step-by-Step)
Here is the full crochet snowgirl pattern, round by round. Check your stitch count against the bracket at the end of each line.
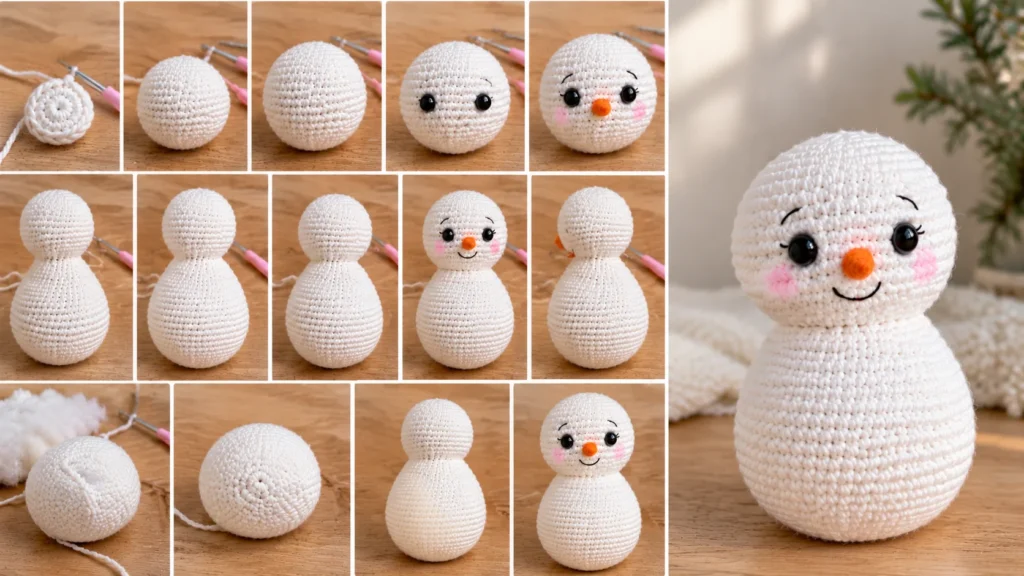
Pro tip: This crochet snowgirl is one seamless piece. The head flows into the body, so you skip the lumpy seam you get from joining two separate spheres.
Head (Rounds 1–10)
- Round 1: 6 SC in MR [6]
- Round 2: INC in each st around [12]
- Round 3: (SC, INC) x6 [18]
- Round 4: (2 SC, INC) x6 [24]
- Round 5: (3 SC, INC) x6 [30]
- Rounds 6–10 (5 rounds): SC in each st around [30]
Eye placement: Push the safety eyes in between Rounds 7 and 8, 6 stitches apart. Low-set eyes give her that sweet, wide-faced look. Pin them first, then snap on the backs before you stuff.
Neck (Rounds 11–13)
- Round 11: (3 SC, DEC) x6 [24]
- Round 12: (2 SC, DEC) x6 [18]
- Round 13: SC in each st around [18]
Stuff the head firmly now. A well-packed neck keeps her head from flopping forward.
Body (Rounds 14–22)
- Round 14: (2 SC, INC) x6 [24]
- Round 15: (3 SC, INC) x6 [30]
- Round 16: (4 SC, INC) x6 [36]
- Round 17: (5 SC, INC) x6 [42]
- Rounds 18–22 (5 rounds): SC in each st around [42]
These rounds build the plump, teardrop silhouette.
Closing the Base (Rounds 23–28)
- Round 23: (5 SC, DEC) x6 [36]
- Round 24: (4 SC, DEC) x6 [30]
- Round 25: (3 SC, DEC) x6 [24]
- Round 26: (2 SC, DEC) x6 [18]
Stop and stuff the body now. Fill the bottom first so she sits upright, then pack the sides, adding fiberfill in small pinches.
- Round 27: (SC, DEC) x6 [12]
- Round 28: DEC x6 [6]
Fasten off and thread the tail through the front loops of the last 6 stitches. Pull tight, then weave in the end.
The Pink Hat and Accessories for Your Crochet Snowgirl
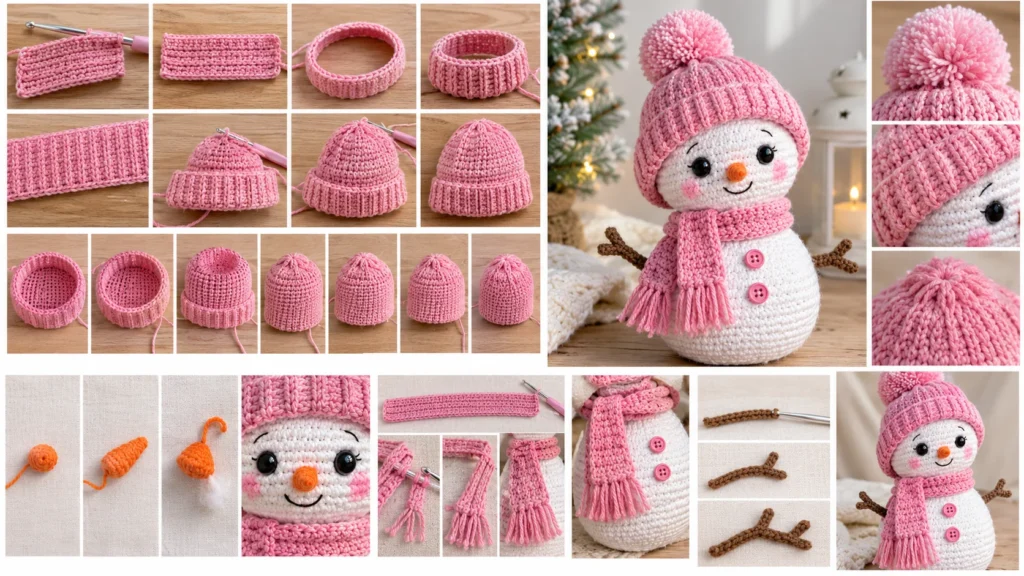
The Pink Hat: A Knit-Look Beanie
The hat is the star of this crochet snowgirl with a pink hat, so it gets a little extra care. You can work the brim two ways. Worked in the round in BLO, it makes horizontal ridges that look like stacked rings. Worked flat in BLO single crochet, then seamed into a ring, the ribs run vertically like real knitting.
I use the flat method for the folded, knit-look rim, then work the crown in the round with pink yarn.
Brim
- Row 1: CH 7, SC in the 2nd CH from the hook and in each CH across [6]
- Rows 2–36 (35 rows): CH 1, turn, SC BLO in each st across [6]
Fasten off, leaving a long tail. Whipstitch the short ends together to form a ring, keeping the seam on the inside. Join pink yarn to either long edge with a SL ST.
Crown (Rounds 1–8)
- Round 1: SC in each row-end around [36]
- Round 2: SC in each st around [36]
- Round 3: (4 SC, DEC) x6 [30]
- Round 4: SC in each st around [30]
- Round 5: (3 SC, DEC) x6 [24]
- Round 6: (2 SC, DEC) x6 [18]
- Round 7: (SC, DEC) x6 [12]
- Round 8: DEC x6 [6]
Fasten off and close the top with the tail.
Finishing the hat
Make a 1.5 inch (4 cm) yarn pom-pom, or use a mini faux-fur pom-pom. White looks crisp against pink, and a matching pink pom-pom looks soft and tonal. Sew it to the top of the crown.
Set the hat on your crochet snowgirl with a slight tilt for character. Pin it, then whipstitch the inside of the brim to Round 6 of the head, where it first reaches 30 stitches. Take slightly more stitches on the low side so the tilt stays put.
Carrot Nose
- Round 1: 4 SC in MR [4]
- Round 2: (SC, INC) x2 [6]
- Round 3: SC in each st around [6]
Fasten off, leaving a long tail. Stuff the cone with a tiny pinch of fiberfill. Sew it between the eyes on Round 9.
Matching Pink Scarf
- Row 1: CH 32, HDC in the 3rd CH from the hook and in each CH across [30]
- Row 2: CH 2, turn, HDC in each st across [30]
Fasten off. For the fringe, cut six 3 inch (7.5 cm) strands of pink yarn. Fold each in half, pull the loop through an end stitch with your hook, and pull the tails through. Put three strands on each end. Wrap the scarf around the neck and tack it with one stitch.
Twig Arms (Optional)
With light brown yarn, CH 8 and SL ST in the 2nd CH from the hook and in each CH across [7]. Fasten off with a 6 inch tail. Make two, then sew them to her sides at Round 16, angled up and out. Skip the arms if you plan to turn her into an ornament.
The Finishing Touches: Giving Your Snowgirl Her Signature Look
These two small details turn a cute snowman into a true crochet snowgirl. Most tutorials skip them, but this amigurumi snowgirl tutorial covers both, so your snowgirl stands out.
Embroidering Feminine Details: Curled Eyelashes
- Separate one strand from a 6-strand skein of black embroidery floss and thread your yarn needle.
- Knot the end. Insert the needle at the back of the head and bring it out at the outer corner of one eye.
- Make three lashes per eye. Build each from two tiny stitches: the first goes up and out, and the second turns at a flatter angle. That bend reads as a curl.
- Tug gently so each stitch sits in the yarn without puckering. Knot at the back and bury the tail.
Stitch both eyes before you judge them. Matching the lash angles on each side matters more than perfect lengths.
The Makeup Trick: Blush Without Staining
Use a matte powder blush in soft pink or peach. Shimmer and cream blushes contain oils that can leave marks on white yarn over time.
- Tap a small, soft brush into the powder and tap off the excess on a paper towel.
- Dab, do not swipe, onto each cheek just below and outside the eye.
- Build the color in two or three light layers.
A pink fabric marker also works. Dab it very lightly, because ink bleeds along the fibers, and test on a scrap swatch first. Powder blush only sits on the surface, so for baby toys embroider the cheeks with pink yarn instead.
Variations & Customization Ideas
Turning Her into an Ornament
Want this crochet snowgirl with a pink hat on your tree? Cut a 10 inch (25 cm) length of twine or metallic ribbon and fold it in half. Use a yarn needle to push both ends through the top of the beanie, straight down into the top of the head, and back up beside the first pass. Knot the ends together inside the hat, then sew the pom-pom over the spot. The loop now holds the head, not just the hat. Stuff her a little lighter so she hangs well.
Color Palette Ideas
Swap bubblegum pink for dusty rose or pastel peach for a softer look. A cream body with a deep rose hat gives your crochet snowgirl a vintage feel. A pale lavender scarf with a pink hat gives a pretty contrast.
Yarn Gauge Variations
The stitch counts stay the same. Thicker yarn and a bigger hook simply make a bigger crochet snowgirl. These sizes are estimates, so work a gauge swatch first.
| Yarn | Hook | Approx. height | Safety eyes |
|---|---|---|---|
| Worsted (#4), as written | 3.25–3.5 mm | 5.5 in (14 cm) | 8–9 mm |
| Chenille or bulky (#5) | 4–4.5 mm | 8 in (20 cm) | 12 mm |
| Blanket or super bulky (#6) | 5–6 mm | 11 in (28 cm) | 15 mm |
Plush chenille hides stitches, so use a stitch marker on every round.
Frequently Asked Questions About the Crochet Snowgirl with a Pink Hat
Can a beginner crochet this snowgirl?
Yes. This crochet snowgirl pattern uses basic stitches: single crochet, increases, and the invisible decrease. The most intricate step is sewing on the accessories, and pinning them first makes it easy.
How do you keep the pink hat from falling off?
Whipstitch the inside of the brim to Round 6 of the head using matching pink yarn. Leave it unsewn only if you want a removable hat for play.
What is the best yarn for amigurumi snowmen?
Mercerized cotton or smooth acrylic in worsted weight (#4) gives a crochet snowgirl tight stitch definition. That prevents the white polyester fiberfill from showing through.
Do I need to sew the head to the body?
No. The head, neck, and body of this crochet snowgirl are worked as one piece from the top down. You only sew on the hat, nose, and any arms.
How long does it take to make a crochet snowgirl with a pink hat?
Most makers finish in 1.5 to 2.5 hours. The head and body take about an hour, and the hat, nose, scarf, and embroidery take the rest.
Can I wash her?
Spot clean with a damp cloth and mild soap. Skip the washing machine if you used blush on the cheeks, because powder can smudge. Embroidered cheeks are safe to wash by hand.
Conclusion
You now have everything you need to make a crochet snowgirl with a pink hat: a seamless head and body, a knit-look beanie, and the eyelash and blush details that give her personality. I hope this amigurumi snowgirl tutorial makes your next winter project easy. Save this crochet snowgirl pattern free of charge, then try my free pocket reindeer crochet pattern next. Happy stitching!