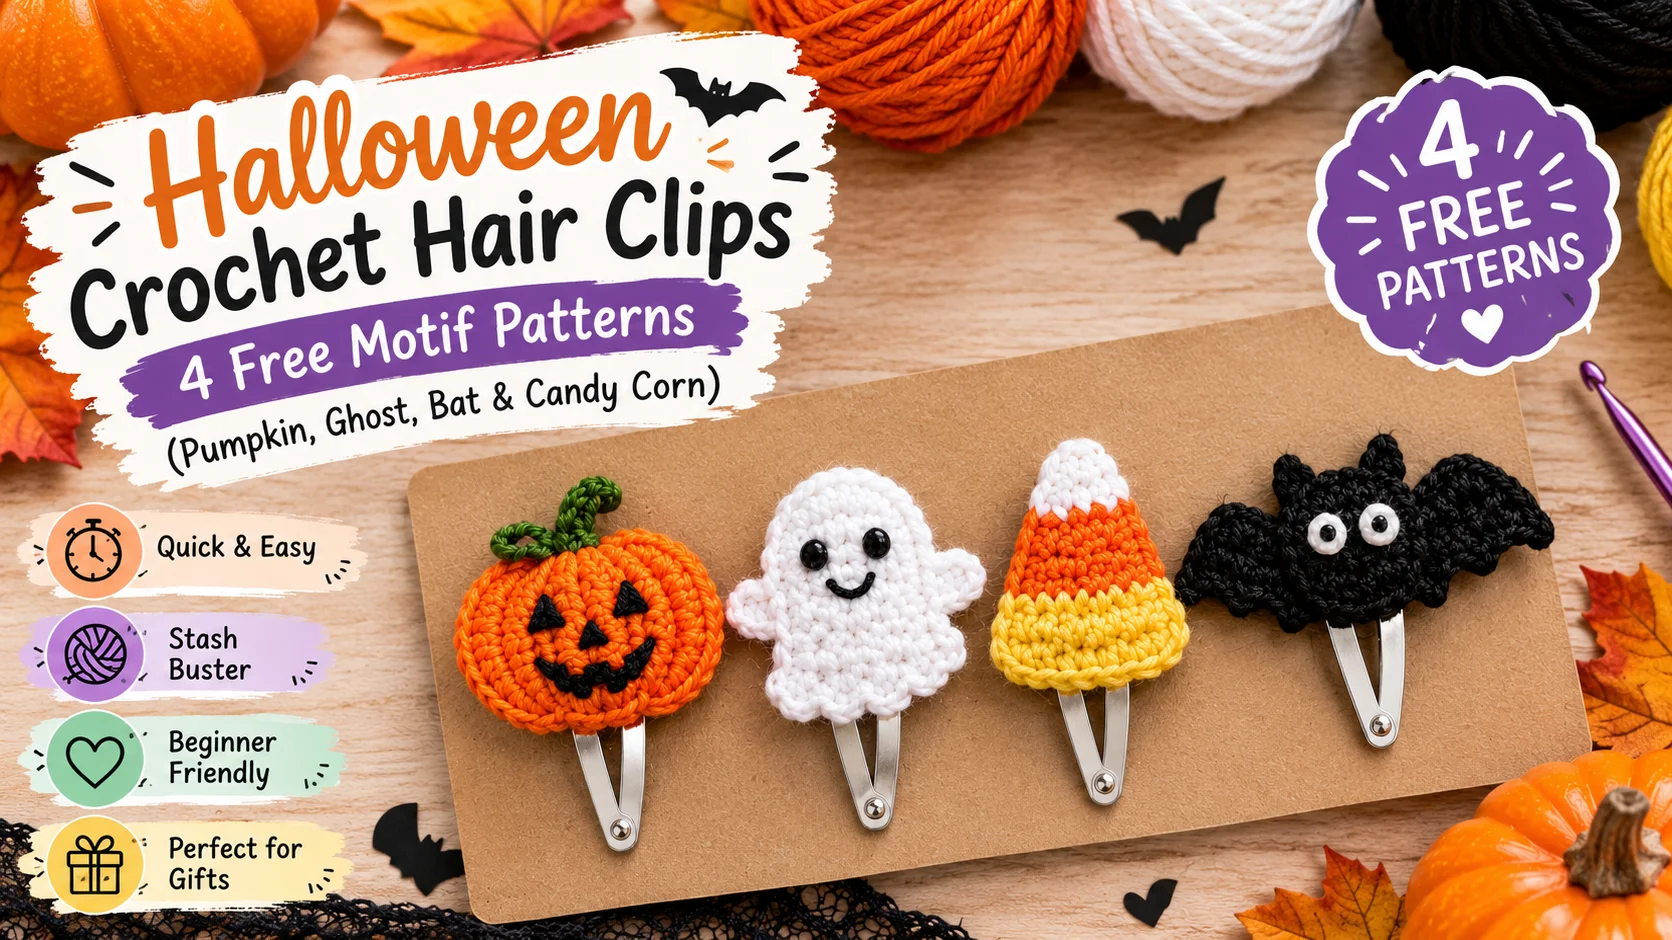
Halloween Crochet Hair Clips: 4 Free Motif Patterns
Halloween crochet hair clips are miniature, flat-lay yarn appliques — such as pumpkins, ghosts, and bats — securely bonded or stitched to metal alligator or snap clips for seasonal wear. They’re the ultimate stash-buster: each motif takes under 20 minutes to make, requires barely a yard of yarn, and consistently ranks among the top-selling handmade accessories at autumn craft fairs.
Whether you’re searching for a crochet pumpkin hair clip pattern, a crochet ghost hair clip free pattern, or something with a little more edge like a midnight bat applique, you’ve found your one-stop Halloween crochet guide. Below you’ll find a quick-reference comparison table, a complete materials checklist, four step-by-step motif patterns, and a professional assembly method that takes your Halloween crochet hair clips from charming to craft-fair–ready.
Table of Contents
Quick-Reference Comparison Table
Use this table to plan your yarn pulls and time your crafting session before diving into the patterns.
| Motif Name | Skill Level | Finished Size | Time to Make | Key Stitch |
|---|---|---|---|---|
| Pumpkin Clip | Beginner | 1.5″ | 12 mins | Half Double Crochet (hdc) |
| Spooky Ghost | Beginner | 1.75″ | 10 mins | Single Crochet Dec (sc2tog) |
| Candy Corn | Beginner | 1.5″ | 15 mins | Color Change / Treble |
| Little Bat | Advanced Beginner | 2.0″ | 18 mins | Picot Stitch / Wings |
Materials, Tools & Safety Checklist
Choosing the right supplies is the difference between a Halloween hair clip that lasts one season and one that becomes a keepsake.
Best Yarn for Crochet Hair Clips
Mercerized cotton (Sport/DK weight or Thread #10) is the top recommendation for crochet hair accessories. Its tightly twisted fiber structure produces crisp, well-defined stitches that hold their shape under daily wear. Cotton also sits flush against hair without pilling or snagging — a real advantage over acrylic, which softens and frizzes over time. Acrylic yarn can absolutely substitute in a pinch, but expect softer edges and less stitch clarity.
Hook Size
Use a 2.25 mm (US B/1) to 2.75 mm (US C/2) hook. A tighter gauge is essential — it keeps any glue or felt backing from peeking through your stitches.
Hardware
- 45mm–50mm alligator clips — the best choice for toddlers and fine hair; the wide jaw grips gently without pulling.
- Snap barrettes — better suited to thick hair; the locking mechanism provides a secure hold all day.
Best Glue for Crochet Hair Clips
Not all adhesives perform equally on the alligator clip-to-yarn join:
- Hot glue — fast and beginner-friendly, but brittle in cold weather and prone to peeling off smooth metal over time.
- E6000 / Fabri-Tac — the professional standard; flexible, permanent, and fully fabric-safe once cured.
- Pro tip — the felt backing technique: Always cut a small oval of craft felt to sandwich between your crochet motif and the clip. Adhesive bonds felt-to-metal far more securely than raw yarn-to-metal, dramatically extending the life of your seasonal hair accessories.
The 4 Free Halloween Crochet Hair Clip Patterns
All patterns use US crochet terms.
Pattern 1: The 10-Minute Mini Jack-o’-Lantern
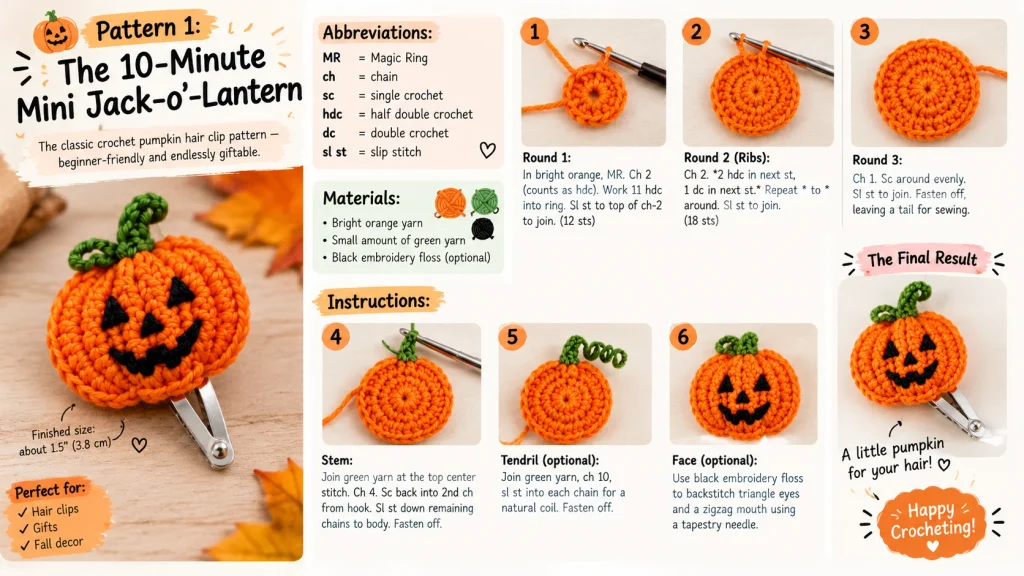
The classic crochet pumpkin hair clip pattern — beginner-friendly and endlessly giftable.
Abbreviations: MR (Magic Ring), ch (chain), sc (single crochet), hdc (half double crochet), dc (double crochet), sl st (slip stitch)
Materials: Bright orange yarn, small amount of green yarn, black embroidery floss (optional)
Instructions:
- Round 1: In bright orange, MR. Ch 2 (counts as hdc). Work 11 hdc into ring. Sl st to top of ch-2 to join. (12 sts)
- Round 2 (Ribs): Ch 2. 2 hdc in next st, 1 dc in next st. Repeat * to * around. Sl st to join. (18 sts)
- Round 3: Ch 1. Sc around evenly. Sl st to join. Fasten off, leaving a tail for sewing.
- Stem: Join green yarn at the top center stitch. Ch 4. Sc back into 2nd ch from hook. Sl st down remaining chains to body. Fasten off.
- Tendril (optional): Join green yarn, ch 10, sl st into each chain for a natural coil. Fasten off.
- Face (optional): Use black embroidery floss to backstitch triangle eyes and a zigzag mouth using a tapestry needle.
Pattern 2: The Spooky Little Ghost
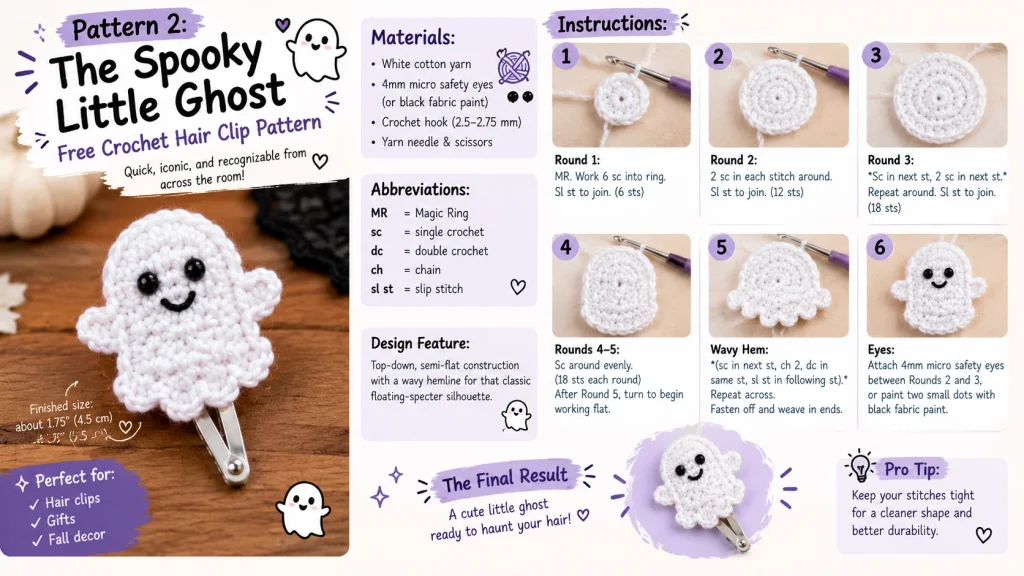
Your free crochet ghost hair clip free pattern — quick, iconic, and recognizable from across the room.
Design Feature: Top-down, semi-flat construction with a wavy hemline for that classic floating-specter silhouette.
Materials: White cotton yarn, 4mm micro safety eyes or black fabric paint
Instructions:
- Round 1: MR. Work 6 sc into ring. Sl st to join. (6 sts)
- Round 2: 2 sc in each stitch around. Sl st to join. (12 sts)
- Round 3: Sc in next st, 2 sc in next st. Repeat around. Sl st to join. (18 sts)
- Rounds 4–5: Sc around evenly. (18 sts each round) After Round 5, turn to begin working flat.
- Wavy Hem: (sc in next st, ch 2, dc in same st, sl st in following st). Repeat across. Fasten off and weave in ends.
- Eyes: Attach 4mm micro safety eyes between Rounds 2 and 3, or paint two small dots with black fabric paint.
Pattern 3: Sweet & Simple Candy Corn
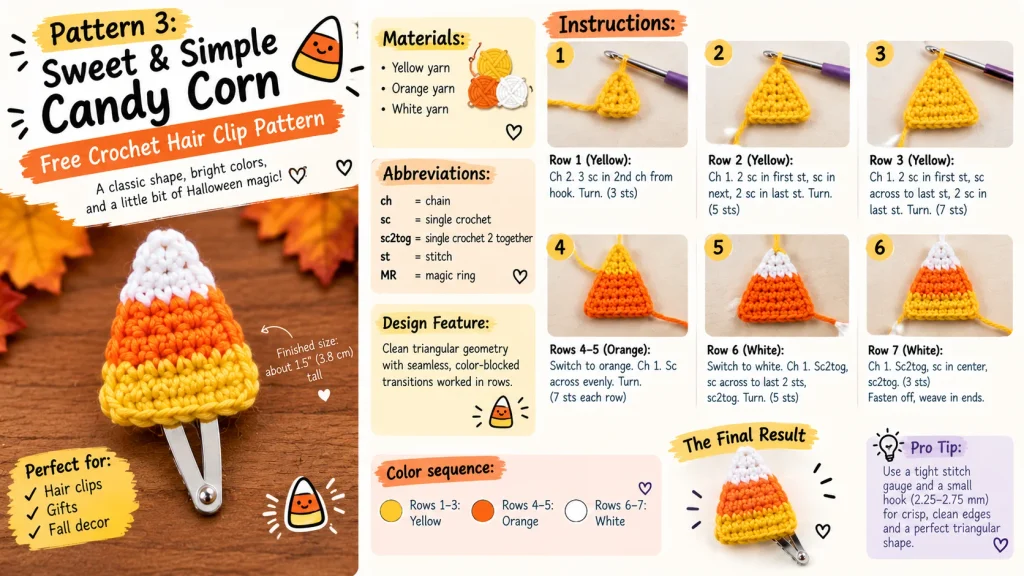
Design Feature: Clean triangular geometry with seamless, color-blocked transitions worked in rows.
Materials: Yellow, orange, and white yarn
Instructions:
- Row 1 (Yellow): Ch 2. 3 sc in 2nd ch from hook. Turn. (3 sts)
- Row 2 (Yellow): Ch 1. 2 sc in first st, sc in next, 2 sc in last st. Turn. (5 sts)
- Row 3 (Yellow): Ch 1. 2 sc in first st, sc across to last st, 2 sc in last st. Turn. (7 sts)
- Rows 4–5 (Orange): Switch to orange. Ch 1. Sc across evenly. Turn. (7 sts each row)
- Row 6 (White): Switch to white. Ch 1. Sc2tog, sc across to last 2 sts, sc2tog. Turn. (5 sts)
- Row 7 (White): Ch 1. Sc2tog, sc in center, sc2tog. (3 sts) Fasten off, leaving a sewing tail. Weave in all color-join ends neatly on the wrong side.
Pattern 4: Midnight Bat Applique
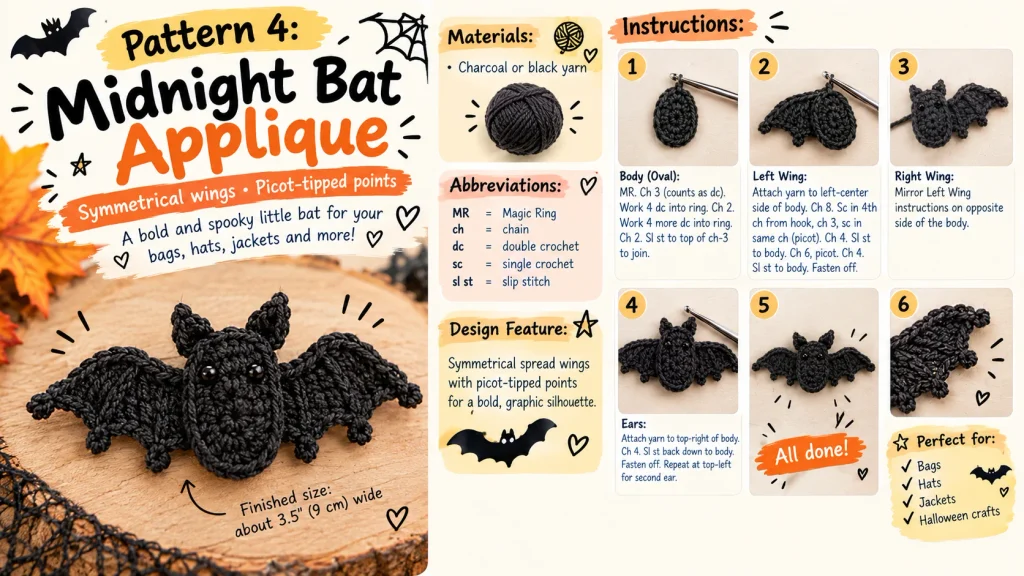
Design Feature: Symmetrical spread wings with picot-tipped points for a bold, graphic silhouette.
Materials: Charcoal or black yarn
Instructions:
- Body (Oval): MR. Ch 3 (counts as dc). Work 4 dc into ring. Ch 2. Work 4 more dc into ring. Ch 2. Sl st to top of ch-3 to join. (Oval body complete)
- Left Wing: Attach yarn to the left-center side of body. Ch 8. Sc in 4th ch from hook, ch 3, sc in same ch (picot made). Ch 4. Sl st to body. Ch 6, picot. Ch 4. Sl st to body. Fasten off.
- Right Wing: Mirror Left Wing instructions on the opposite side of the body.
- Ears: Attach yarn to top-right of body. Ch 4. Sl st back down to body. Fasten off. Repeat at top-left for second ear.
How to Assemble & Secure Halloween Crochet Hair Clips
A beautifully crocheted motif deserves an assembly method that makes it last. Here’s the step-by-step process used by professional crochet sellers.
- Line the clip (optional but recommended): Wrap a 3/8″ grosgrain ribbon tightly around the alligator clip and secure with a small bead of E6000. This prevents pinching and gives your adhesive a textile surface to grip — far better than bare metal.
- Cut the stabilizer: Cut an oval of matching craft felt slightly smaller than your finished crochet motif so it won’t be visible from the front.
- The Sandwich Method:
- Apply a thin, even layer of Fabri-Tac or E6000 to the back of the crochet motif and press it firmly onto the felt oval.
- Slide the top prong of the alligator clip between the felt and the back of the crochet piece.
- Run a thin bead of adhesive along the prong and press the felt closed over it, encasing the prong completely.
- Cure: Clamp the finished assembly with a clothes-peg and allow 12–24 hours to cure fully before wear. Rushing this step is the number-one reason clips fail.
Packaging & Craft Fair Pricing
Halloween crochet hair clips move fast at seasonal markets. Here’s how to price them and display them for maximum sales.
Pricing formula:
(Material Cost + (Minutes to Make × Hourly Rate)) × 2 = Retail Price
At a $15/hour rate, a 15-minute motif with $0.30 in materials retails at approximately $8–$10 each, or $24–$28 for a set of four. Bundling three clips on a kraft card labeled “Spooky Hair, Don’t Care” adds visual punch and encourages larger purchases — the $10 three-pack consistently outsells single-clip pricing at craft fairs.
Frequently Asked Questions
What is the best glue to attach crochet to metal hair clips? Clear, flexible craft adhesives like E6000, Fabri-Tac, or Gorilla Fabric Glue work best for attaching yarn appliques to metal clips. Hot glue is faster but can peel off smooth metal surfaces over time; adding a felt backing between the crochet piece and the clip creates a far more durable, permanent bond.
Can I use acrylic yarn instead of cotton for crochet hair clips? Yes, but 100% mercerized cotton is the preferred yarn for crochet hair accessories. Cotton provides crisp stitch definition, holds its shape without sagging under daily wear, and doesn’t pill or catch in hair the way acrylic yarn can over repeated use.
How do I make crochet hair clips non-slip for babies and toddlers? Line the inside of the alligator clip with a small strip of silicone non-slip grip tape or ribbed velvet ribbon. This creates gentle friction against fine hair, preventing the clip from sliding loose throughout the day.
How long does it take to make a set of Halloween crochet clips? A single motif takes between 10 and 20 minutes to crochet. A complete set of four — pumpkin, ghost, candy corn, and bat — is achievable in under an hour, making Halloween crochet hair clips one of the most time-efficient seasonal projects you can make before a craft fair.
Ready to Make Your Spooky Set?
There you have it — everything you need to crochet, assemble, and even sell your own Halloween crochet hair clips this season. Four motifs, one hour of crafting time, and barely a dent in your yarn stash. Whether you’re dressing up a toddler’s costume, adding a spooky touch to your own look, or stocking a craft fair table before October 31st, these patterns deliver big results for minimal effort.
If you make any of the motifs, we’d love to see your finished clips! Drop a photo in the comments below and tell us which one was your favorite to make — the pumpkin, the ghost, the candy corn, or the bat?
📌 Save this post to your Halloween Crochet board on Pinterest so you can find it again when the crafting mood strikes — and share it with a crochet friend who needs a quick seasonal project.
Happy hooking! 🎃